7III Tap User Manual
← 7III Tap Videos Support Version History Controllers for Ableton Live
This is the user manual for 7III Tap, an Ableton Live controller for iPad & iPhone, with customizable MIDI CC encoders.
Last Update:
If you find any mistakes or notice anything missing in this user manual, please reach out and let us know!
Table of Contents
- 1. Quick Start
- 2. Set Up
- 3. User Interface
- 4. Tips and Tricks
1. Quick Start
Below is a video to help you get started. It follows the Mac version of this manual, but most steps are similar on other systems. You can begin by following along with the Set Up section. After the Set Up steps the video shows an older version of Tap without the new Performance Features. For the current navigation, refer to the Performance Features section, which includes a short updated video.
2. Set Up
Note: If you are only going to use the Encoders, then you can directly jump to Connect your iPhone or iPad.
2.1 Add the Tap MIDI Remote Script
- On your computer, download the MIDI Remote Script at project7iii.com/tap/Tap.zip.
- Manually create a folder called
Remote Scriptswithin your User Library if it does not already exist. The default User Library locations are:Windows
\Users\[username]\Documents\Ableton\User Library
MacMacintosh HD/Users/[username]/Music/Ableton/User Library - Place the unzipped remote script folder called Tap into the Remote Scripts folder you just created.
- Your directory should now look like this:
Ableton/
└── User Library/
    └── Remote Scripts/
        └── Tap/
            ├── __init__.py
            ├── Tap.py
            └── README.md (optional, can be removed)
Important: Make sure the User Library is stored locally on your computer and matches the exact path described above. If it is cloud-based or even slightly misnamed, Ableton Live may fail to recognize the script.
2.2 Connect your iPhone or iPad
For the most reliable connection, use a wired setup whenever possible.
If you are never using MIDI over WiFi, you can disable MIDI over WiFi in Tap's settings.
For a one-to-one wireless connection, try Bluetooth MIDI before Network MIDI. Bluetooth connects directly without a WiFi router or Network MIDI session, and it can be more consistent than a busy WiFi network. The MIDI Association notes that Bluetooth MIDI is often less likely than WiFi to encounter interference from other devices. Wireless performance still depends on the computer, distance, and interference; use a cable for the most reliable connection, especially with dense MIDI feedback in complex Live Sets.
2.2.1 macOS: Over USB-C
- Connect your iPhone or iPad to your Mac using a USB-C cable.
- Open the app Audio MIDI Setup.
- Open the Audio Devices window.
→ If it is not already visible, select the Window → Audio Devices menu to display it. - Find your iOS device in the sidebar and click the Enable button.
You do not need a Thunderbolt or USB 3 cable. A data-capable USB 2.0 cable is already fast enough for Tap. The important bit is the word data: a charge-only cable may charge your device, but it cannot create the MIDI connection. The USB-C cable supplied with your iPhone or iPad is suitable.
2.2.2 Windows: Wired MIDI interface setup
This is the recommended Windows setup. It is wired, bidirectional, and does not rely on WiFi. But it needs two MIDI interfaces, the easiest setup for Windows probably is our new Bluethoot MIDI setup.
Feeling extra brave? Try the even more direct setup below and let us know if it works for you!
The connection is:
iPhone/iPad
◉
│ USB cable
◉
Simple USB-C MIDI interface with two MIDI cables
◉          ◉
│ MIDI IN  │ MIDI OUT
◉          ◉
CME H2MIDI Pro or another MIDI interface
◉
│ USB cable
◉
Windows PC with Ableton Live
- Connect a USB-C MIDI interface to your iPhone or iPad.
- Connect the CME H2MIDI Pro or CME H4MIDI WC (or your existing Audio Interface with MIDI) to your Windows computer via USB.
- Connect MIDI OUT from the iPhone/iPad interface to MIDI IN on the CME interface.
- Connect MIDI OUT from the CME interface to MIDI IN on the iPhone/iPad interface.
- Open Tap and select the connected MIDI interface as MIDI input/output if needed.
- In Ableton Live on Windows, select the CME interface as the MIDI input and output for Tap.
This keeps the iPhone or iPad in its usual supported role: it is the USB host for a class-compliant USB MIDI interface. The CME interface handles the Windows side.
MIDI interface for iPhone/iPad:
🇺🇸 USB-C MIDI Interface on Amazon
🇪🇺 USB-C MIDI Interface on Amazon
Windows-side USB MIDI host/interface options:
🇺🇸 CME H2MIDI Pro on Amazon
🇪🇺 CME H2MIDI Pro on Amazon
🇺🇸 CME H4MIDI WC on Amazon
🇪🇺 CME H4MIDI WC on Amazon
Note: As an Amazon Associate we earn from qualifying purchases.
2.2.3 Windows: Experimental direct USB MIDI host bridge
This setup may work, but it is not tested by us yet.
The connection would be:
iPhone/iPad
◉
│ USB cable
◉
USB-A host port on CME H2MIDI Pro or CME H4MIDI WC
USB-C computer port on CME H2MIDI Pro or CME H4MIDI WC
◉
│ USB cable
◉
Windows PC with Ableton Live
- Connect your iPhone or iPad to the USB-A host port of the CME H2MIDI Pro or CME H4MIDI WC.
- Connect the USB-C computer port of the CME H2MIDI Pro or CME H4MIDI WC to your Windows computer.
- Open Tap and select the connected USB MIDI interface as MIDI input/output if needed.
- In Ableton Live on Windows, select the CME interface as the MIDI input and output for Tap.
This should allow communication through USB MIDI virtual ports if the iPhone or iPad is recognised correctly by the CME USB host port. We have not tested this yet. Please let us know if it works for you in practice.
If it does not work, use the wired MIDI interface setup above.
2.2.4 macOS: Bluetooth MIDI
Bluetooth MIDI gives you a direct, bidirectional wireless connection without joining a WiFi network. See Apple's Bluetooth MIDI instructions.
- In Tap, open Settings → Bluetooth MIDI. Keep this panel open while making the first connection.
- On your Mac, open Audio MIDI Setup → MIDI Studio → Configure Bluetooth.
- Select your iPhone or iPad and click Connect.
- If it is not listed, return to Tap's Bluetooth MIDI panel and turn on Advertise MIDI Service, then look again on the Mac. Advertising is only needed to make Tap discoverable while starting the connection.
- In Ableton Live, select the Bluetooth MIDI device as both Tap input and output.
2.2.5 Windows: Bluetooth MIDI
Bluetooth MIDI connects directly and avoids WiFi congestion, router setup, and Network MIDI sessions. There are two practical routes:
Windows MIDI Bluetooth Setup
Microsoft's Windows MIDI Bluetooth Setup supports standard Bluetooth LE MIDI devices such as Tap. The software is currently a separate preview and is not part of the normal Windows consumer release yet. Bluetooth MIDI is tested with Tap on macOS; this Windows combination has not yet been tested by us.
- In Tap, open Settings → Bluetooth MIDI. If Tap does not appear on Windows, turn on Advertise MIDI Service.
- Open Windows MIDI Bluetooth Setup and connect to the iPhone or iPad.
- Allow the connection if Windows asks.
- In Ableton Live, select the new Bluetooth MIDI endpoint as both Tap input and output.
USB Bluetooth MIDI adapter
A USB Bluetooth MIDI adapter that can act as a Bluetooth central can handle the wireless connection and appear in Windows as an ordinary USB MIDI interface. One good fit is the CME WIDI Bud Pro, which supports bidirectional MIDI with standard Bluetooth MIDI devices, including iPhone and iPad. This Tap setup has not yet been tested by us. If you already use it with Tap, please let us know how it works.
- Connect the USB Bluetooth MIDI adapter to the Windows computer.
- In Tap, open Settings → Bluetooth MIDI and make Tap discoverable if needed.
- Pair the adapter with the iPhone or iPad according to its instructions.
- In Ableton Live, select the adapter as both Tap input and output.
The adapter must support central mode. Two Bluetooth peripherals cannot initiate a connection to each other.
2.2.6 macOS: Over WiFi
If USB-C or Bluetooth MIDI is not available, you can also use MIDI over WiFi on macOS. Use a clean, stable WiFi network and avoid busy public or shared networks.
- Connect your iPhone or iPad to the same WiFi as your Mac.
- Follow this Apple guide. You do not need to do Step 9.
2.2.7 Windows: rtpMIDI over ad hoc WiFi
If a wired or Bluetooth MIDI setup is not available, use a dedicated ad hoc WiFi network instead of a busy normal WiFi network.
- Create an ad hoc WiFi network on your Windows computer.
- Connect your iPhone or iPad to that WiFi network.
- Download rtpMIDI.
- Open rtpMIDI on Windows and create a new session.
- Open Tap on your iPhone or iPad.
- Connect your iPhone or iPad in the rtpMIDI session.
- In Ableton Live, select the rtpMIDI session as the MIDI input and output for Tap.
2.3 Set Up Live
- Launch Live.
- Open Live's Preferences and navigate to the MIDI tab.
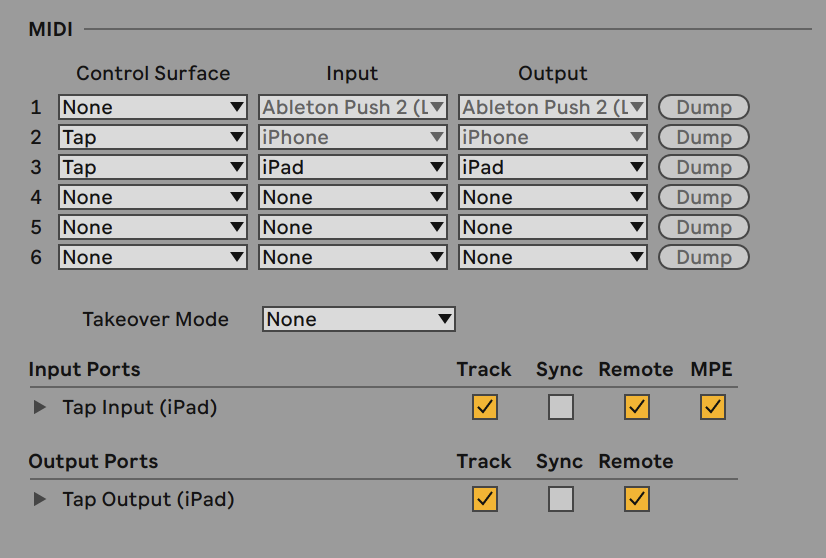
- Select the script Tap using the dropdown menu in the Control Surface column.
- Assign your USB device, Bluetooth MIDI endpoint, or Network Session as input and output ports.
- Activate Track and Remote for your active MIDI ports.
- If you want to use MPE Pads, also activate MPE for Tap's input port.
Tap's Test connection to Ableton Live button tells you where the connection stops:
- No MIDI ports found: check the data cable, MIDI interface, Bluetooth connection, or Network MIDI session.
- One-way MIDI: Tap can see only an input or output. It needs both.
- Remote Script did not answer: check the Tap Control Surface and its selected input and output in Live.
- Wrong Remote Script version: install the current Tap Remote Script.
- Connection lost: reconnect the cable or wireless MIDI route and test again.
The connection test still works after the free playing time has ended. It checks the setup without unlocking control of Live.
2.4 Troubleshooting
If Tap does not connect correctly, first check the basics:
- Make sure the Tap MIDI Remote Script is selected in Live's Control Surface column.
- Make sure the same active device, MIDI interface, or Network Session is selected as both Input and Output.
- Make sure Track and Remote are enabled for your active MIDI input and output ports.
- Restart Tap and Ableton Live after changing MIDI ports or connection methods.
2.4.1 Windows: rtpMIDI troubleshooting
If you are using rtpMIDI on Windows and the connection does not appear, or if Tap behaves strangely, reset the rtpMIDI setup.
- Open rtpMIDI.
- Delete all existing sessions.
- Remove all participants and directory entries.
- Remove duplicate, old, or inactive device entries.
- Create a brand new session with a new name.
- Restart your iPhone or iPad.
- Restart your Windows computer.
- Open rtpMIDI again and connect the device before launching Ableton Live.
If possible, use a dedicated ad hoc WiFi network instead of a busy home, studio, or public WiFi network.
2.4.2 Windows: wired MIDI troubleshooting
If you are using a wired MIDI interface setup, check the MIDI cable direction carefully.
iPhone/iPad interface MIDI OUT → Windows/CME interface MIDI IN
Windows/CME interface MIDI OUT → iPhone/iPad interface MIDI IN
- Make sure both MIDI cables are connected. Tap needs MIDI in and out.
- Make sure the iPhone/iPad-side MIDI interface is visible in Tap.
- Make sure the Windows-side MIDI interface is visible in Ableton Live.
- In Live, select the Windows-side MIDI interface as both input and output for Tap.
- If nothing reacts, swap the MIDI cables once to rule out reversed IN/OUT labeling.
2.4.3 Mac: USB troubleshooting
On macOS, connection problems are usually caused by the USB cable.
- Use the USB-C cable that came with your iPhone or iPad if possible.
- If you do not have the original cable, use a standards-compliant cable that explicitly supports data. USB 2.0 or better is enough.
- Avoid charge-only cables. They may charge the device but cannot create the IDAM MIDI ports.
- Connect the iPhone or iPad directly to the Mac instead of through a hub.
- Unlock the iPhone or iPad before reconnecting it. If necessary, check Settings → Privacy & Security → Wired Accessories.
- Open Audio MIDI Setup and make sure the iPhone or iPad is enabled in the Audio Devices window.
- Restart the iPhone or iPad and the Mac if the device does not appear.
2.4.4 Mac: Refresh the MIDI configuration
If Live's MIDI indicator flashes but Tap's connection test says the Remote Script did not answer, try a new MIDI configuration in Audio MIDI Setup. Keep the old configuration so you can switch back.
- Quit Ableton Live.
- Open Audio MIDI Setup → Window → Show MIDI Studio.
- Choose New Configuration from the configuration menu.
- If you use Network MIDI, create and enable the RTP session again.
- Open Live and select Tap with the same MIDI input and output.
See Apple's instructions for creating a MIDI configuration and Ableton's macOS MIDI troubleshooting guidance.
If Tap still does not connect, follow Ableton's Live reset steps. Move Preferences.cfg to the Desktop as described there. This resets Live's audio and MIDI settings, so set them up again.
2.4.5 Bluetooth MIDI troubleshooting
If the Bluetooth MIDI device disappears, open Tap's Bluetooth MIDI panel. If it does not reconnect, turn on Advertise MIDI Service and connect again from the computer or Bluetooth MIDI adapter. A Bluetooth MIDI peripheral can normally connect to only one host at a time, so disconnect it from other computers, phones, or tablets first. If control or feedback feels slow in a complex Live Set, use USB or wired MIDI instead.
2.4.6 Live still does not react
If the connection appears to work but Live does not react:
- Check that Takeover Mode is set to None.
- Check that the selected MIDI ports are not already used by another controller script.
- Try disabling and re-enabling the Tap Control Surface in Live's MIDI preferences.
- Restart Live after changing the MIDI Remote Script folder or MIDI port setup.
3. User Interface
There are 5 views in Tap.
The main Tap interfaces are the familiar views of Ableton Live: Device View, Clips View, and Mixer View.
Tap also has one extra view, which are customizable encoder pages to control just about anything that accepts MIDI CC: Encoders.
3.1 Home View
This is where every adventure starts.
- Select Test connection to Ableton Live and then Play Tap to play Tap. The connection test remains available when the free playing time is over.
- Tap Connection Helper for step by step connection instructions.
- Tap Test Tap without Connection to explore Tap without connection.
- Tap Start Encoders to go straight to the standalone Encoders View.
- Also available in the Home View: Help and Settings.
3.1.1 Settings
In Settings you can configure very useful things, like the connection or touch indicators (great for tutorials etc.).
- MIDI over WiFi enables or disables Tap's Network MIDI session. USB, MIDI interfaces, and connected Bluetooth MIDI devices remain available.
- Bluetooth MIDI opens Apple's connection panel. If the computer cannot find Tap, use Advertise MIDI Service there to make the iPhone or iPad discoverable while connecting.
- You will also find a button to enable/disable all Performance Features.
- Default MIDI Layout sets which note layout Tap should use when you arrive in the MIDI pads of a MIDI track. You can choose the compact pad layouts, the larger pad layout, or the keyboard layout. On iPad the default "pad" choice is the 8 Pads layout; on iPhone it is the 4ths layout.
- Track Controls Expression chooses whether the expression encoder in Track Controls sends Slide (CC74) or Pressure. Slide is the default.
- MPE Pads makes all playable pad layouts expressive, including Drum Racks: touch height can set velocity, horizontal movement bends each note separately, and vertical movement sends Pressure or Slide. See MPE Pads for setup and playing details.
- Companion Presets lets you import and export Companion presets, create folders, move presets between folders, reorder presets, and remove presets or folders.
3.2 Main Views
The main Ableton Live controller views share some common elements, described below.
3.2.1 Tracks Bar
The top bar showing the tracks of your Live project.

- A little half circle at the start or end indicates that there are more tracks to be found in that direction.
- Navigate between tracks by swiping left or right. To select a track, tap on it. The currently selected track is displayed in bold font.
- When you tap on a track that is already selected, you switch the main view!
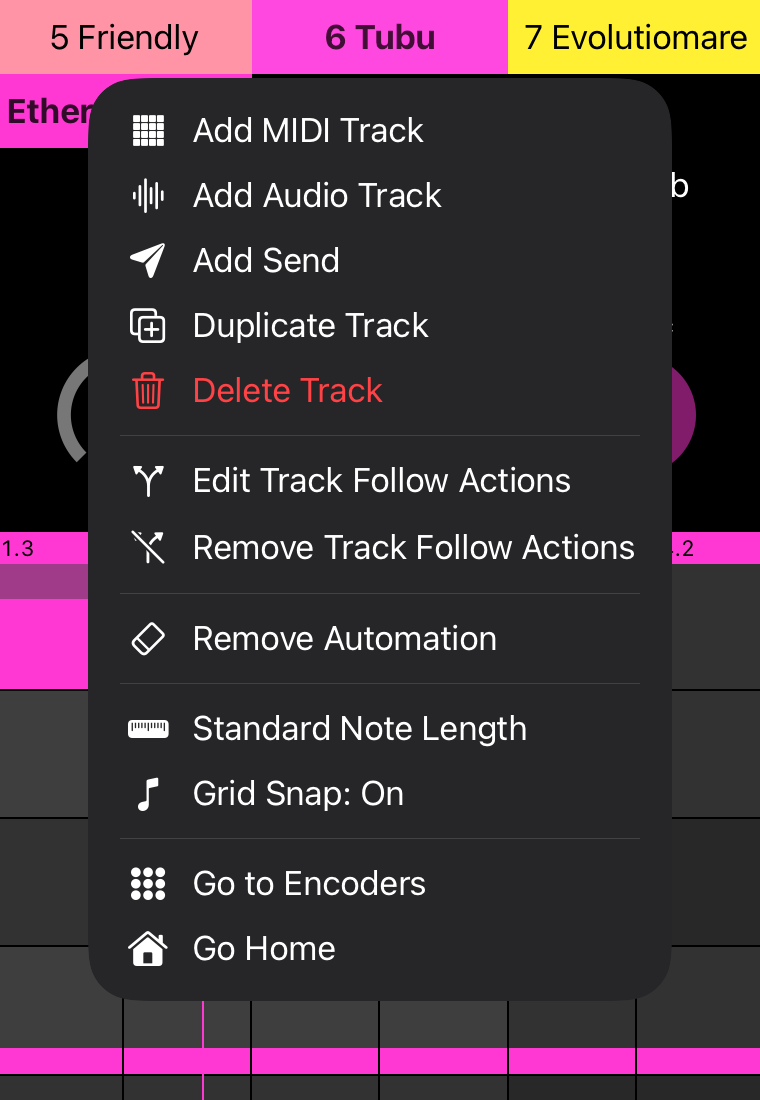
- A long-press opens the track's context menu where you can:
- add a MIDI track
- add an audio track
- add a return track/send
- duplicate the selected track
- delete track
- fold or unfold a Group Track, if the track is a group or belongs to one
- set or edit Follow Actions for all clips on that track
- toggle arm of the track (if audio track)
- re-enable automation, either for the whole Live Set or for the next touched parameter
- remove automation from the next touched parameter
- activate "select a drum pad without playing it" (only with active drum pad layout)
- swap a specific Drum Rack pad (only with an active drum track)
- configure the standard note length (only with active step sequencer)
- turn sequencer note Grid Snap on or off (only with active step sequencer)
- go Home
- go to Encoders
Group tracks show a group indicator in the Tracks Bar. When a group is folded in Live, Tap hides the tracks inside that group as well, so the Tracks Bar behaves like Live's Session View: fold the group to make room, unfold it when you want access to the child tracks again.
3.2.2 Footer Bar
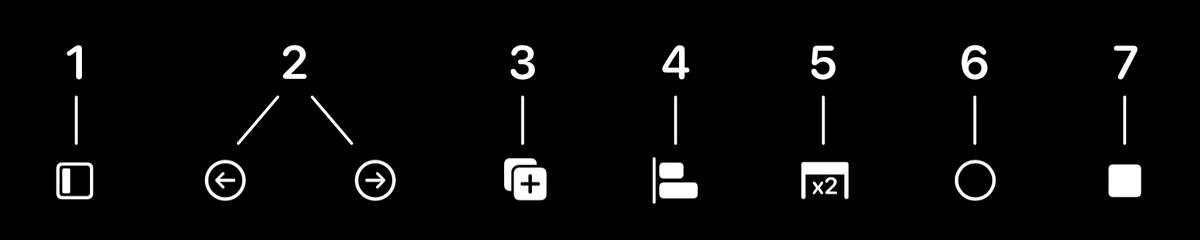
Here's a detailed look at the buttons in the Footer Bar in vertical mode:
Here is the Footer Bar in horizontal mode in the Device View, in all other views it looks like the one above, simply turned 90 degrees:
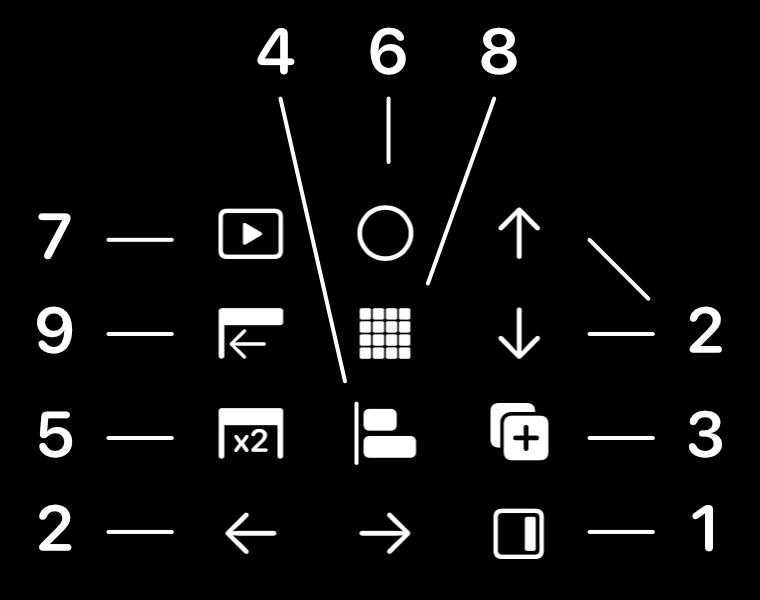
-
Side Panel/Encoders Button
The side panel opens the options side panel in the Device View, where you will find layout, velocity, pitch-bend/modwheel, scale, root, and octave/drums page.
In the Clips and Mixer Views, this button activates the Scene Launch buttons. In Automation Editing, it becomes Add Curves (⊕); tap it to open the Curve Generator. Long-press opens the Encoders View. -
Navigation Buttons
In Device view you can use these buttons to move up and down through the octaves/drums pages and going forward and backwards through the Step Sequencer pages. To change the mode, you simply swipe left or right over the navigation buttons. Long-press on the left-pointing arrow to undo; long-press on the other to redo. In the rest of the views, the buttons will simply be undo and redo (arrows in circle means undo redo).
If you deactivate the Performance Features in Settings you can navigate the three main views via the arrow buttons. In the Encoders View, this will move forward and backward through the encoder pages if you have more than one page. -
Duplicate/Stop In Device View: Duplicates the selected clip. Long-press will duplicate the selected scene.
In the other views: Stops all the clips. -
Quantize
Quantizes the notes of the selected clip.
Long-press will show detailed quantize options. When Note Repeat is active in a MIDI pads or keyboard layout, this becomes the Repeat Rate control instead: tap it to move to the next rate, or drag left and right to select a rate. -
Capture/Double Loop/Home
In Device View, with a keyboard or pads active, this captures the MIDI just played.
If you are in the Step Sequencer layout, tap to duplicate the selected loop. Long-press to multiply its length by two instead: Tap uses Live's native note-modification path to stretch the notes and their lengths while preserving Live-owned MPE expression. If the clip has a separate decoupled automation loop, use Unfold Clip first. In all other views, this will get you back to the Home View. -
Record
Activates or deactivates the session record button. -
Play/Stop/Play Menu/Tempo
In the step sequencer with Performance Features: Single Tap opens the Play Menu. Long-press opens the Tempo Overlay.
In all other layouts and views: Starts or stops the playback. Long-press opens the Tempo Overlay.
In the Step Sequencer without Performance Features: Long-press shows a context menu for stopping, starting, adding, going to different clips, and the Tempo Overlay.
In the Browser, holding the previous or next page button accelerates page changes. You can also tap the page indicator, type a page number, and press Go. This is useful for large Live libraries.
Extra buttons in the horizontal Footer Bar of the Device View:
-
Switch from Pads to Sequencer and vice versa.
-
Go to start of loop (only in Sequencer), stop all clips (in Pads)
Play Menu
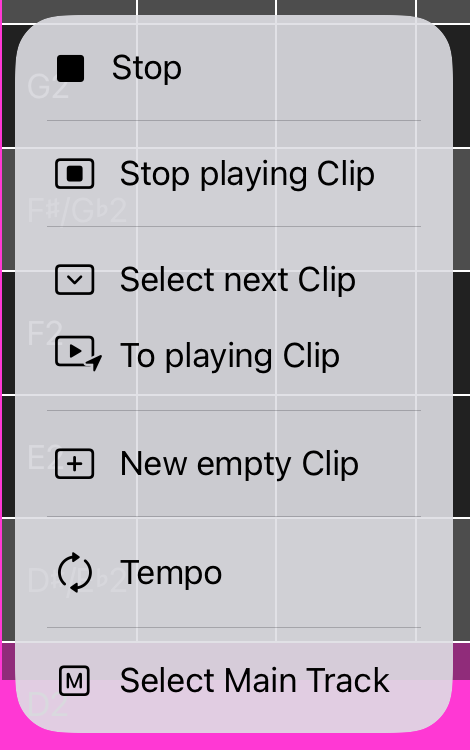
A menu showing different actions, depending on status:
- Global Play/Stop
- Start/Stop selected Clip
- Select previous Clip
- Select next Clip
- New empty Clip
- Tempo
- Note Repeat On/Off (in MIDI pads and keyboard layouts, including Drum Racks)
- Repeat Options
- Select Main Track
Note Repeat
Note Repeat is available in the MIDI pads and keyboard layouts, including tracks containing Drum Racks. It is not shown in the Step Sequencer. Open the Play Menu and tap Note Repeat to switch it on or off. The menu symbol shows whether Repeat is active.
Hold a pad while Note Repeat is active to play or record a tempo-synchronised stream of evenly spaced notes. Tap uses Live's native note-repeat engine, so the repeat follows Live's tempo. Repeat always controls the currently selected MIDI track. Each track remembers its own Repeat On/Off state and rate in the Live Set, and Tap restores them when you select that track again.
While Repeat is active, the Quantize button in the Footer Bar becomes a Repeat Rate control and displays the current rate. Tap it to cycle through the rates; after the last rate it returns to the first. You can also drag left and right over it to move through the rates. The available rates are 1/4, 1/4T, 1/8, 1/8T, 1/16, 1/16T, 1/32, and 1/32T.
Choose Repeat Options in the Play Menu to open three track-coloured controls:
- Rate selects the repeat rate.
- Swing sets Live's global song swing from 0–100%. It is bidirectional: changes made in Live are reflected in Tap, and changes in Tap are sent to Live.
- Pad Pressure enables or disables vertical pressure gestures on repeating pads. Tap remembers this preference. When enabled, drag up or down while holding a repeating pad to increase or decrease that pad's pressure/velocity. With MPE Pads enabled, horizontal dragging remains available for per-note pitch bend; with Note Pitch Bend set to Off, it moves between pads instead.
Tap outside Repeat Options to close it.
The Velocity slider in the Side Panel and the Velocity encoder in Track Controls both control Tap's fixed pad velocity. If you change either control while pads are already repeating, all currently held repeating pads update to the new velocity without restarting the repeat timing. With Pad Pressure enabled, you can then adjust each held pad individually by dragging up or down on that pad.
Tempo Overlay
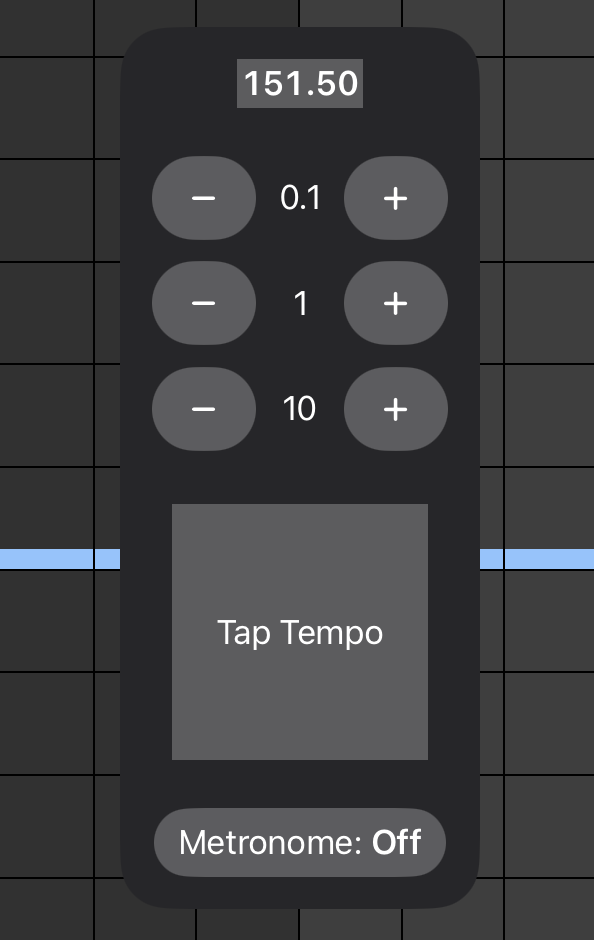
Tapping the plus and minus buttons will adjust the tempo by the amount indicated in the center.
Tapping on the BPM digits lets you type in the exact tempo you want.
The Tempo Overlay also has a Tap Tempo pad and a Metronome button. Tap Tempo sends Live's tap-tempo command, so several taps set the song tempo from your rhythm. The Metronome button mirrors Live's metronome state and toggles it on or off.
3.3 Device View
3.3.1 Devices Bar
The devices are shown here.
- You can navigate by swiping left or right.
- Select a device by tapping on it. The selected device has a bold font.
- Track Controls are accessed through the
☰item at the beginning of the Devices Bar. Selecting it opens controls for the currently selected track. On MIDI tracks, this includes Mod Wheel, the selected Slide or Pressure expression control, Pitch Bend, and Velocity, followed by mixer controls such as Volume, Pan, and Sends.- Choose Slide or Pressure in Settings → Track Controls Expression. Slide is the default and sends MIDI CC74; Pressure sends channel pressure. The encoder sends live MIDI continuously, so either expression can change sustaining notes and notes sounding during playback, just as the previous Pressure control did. Each track remembers separate Slide and Pressure values.
- Mixer controls are standard Live parameters and can be automated. Mod Wheel, Slide, Pressure, and Pitch Bend can be recorded into clips, but their automation is not shown through moving indicators and cannot be edited in Automation Editing. Velocity sets the fixed velocity used by pads that do not have height-based velocity enabled, and can also be used to adjust the velocity of selected notes in Step Sequencer.
- Tap the
⊕symbol to open the Browser or add a new random device. You can choose between adding a random sound, synth, drums (if you are in a MIDI track), or effect. <(open) and>(closed) symbols indicate rack mothers. You can open and close racks by tapping on a selected rack mother. Chain start and ends are indicated by corner brackets. The chain number is indicated with circles below the first member of the chain (for more than one chain per rack mother).

Browser
Browse away!
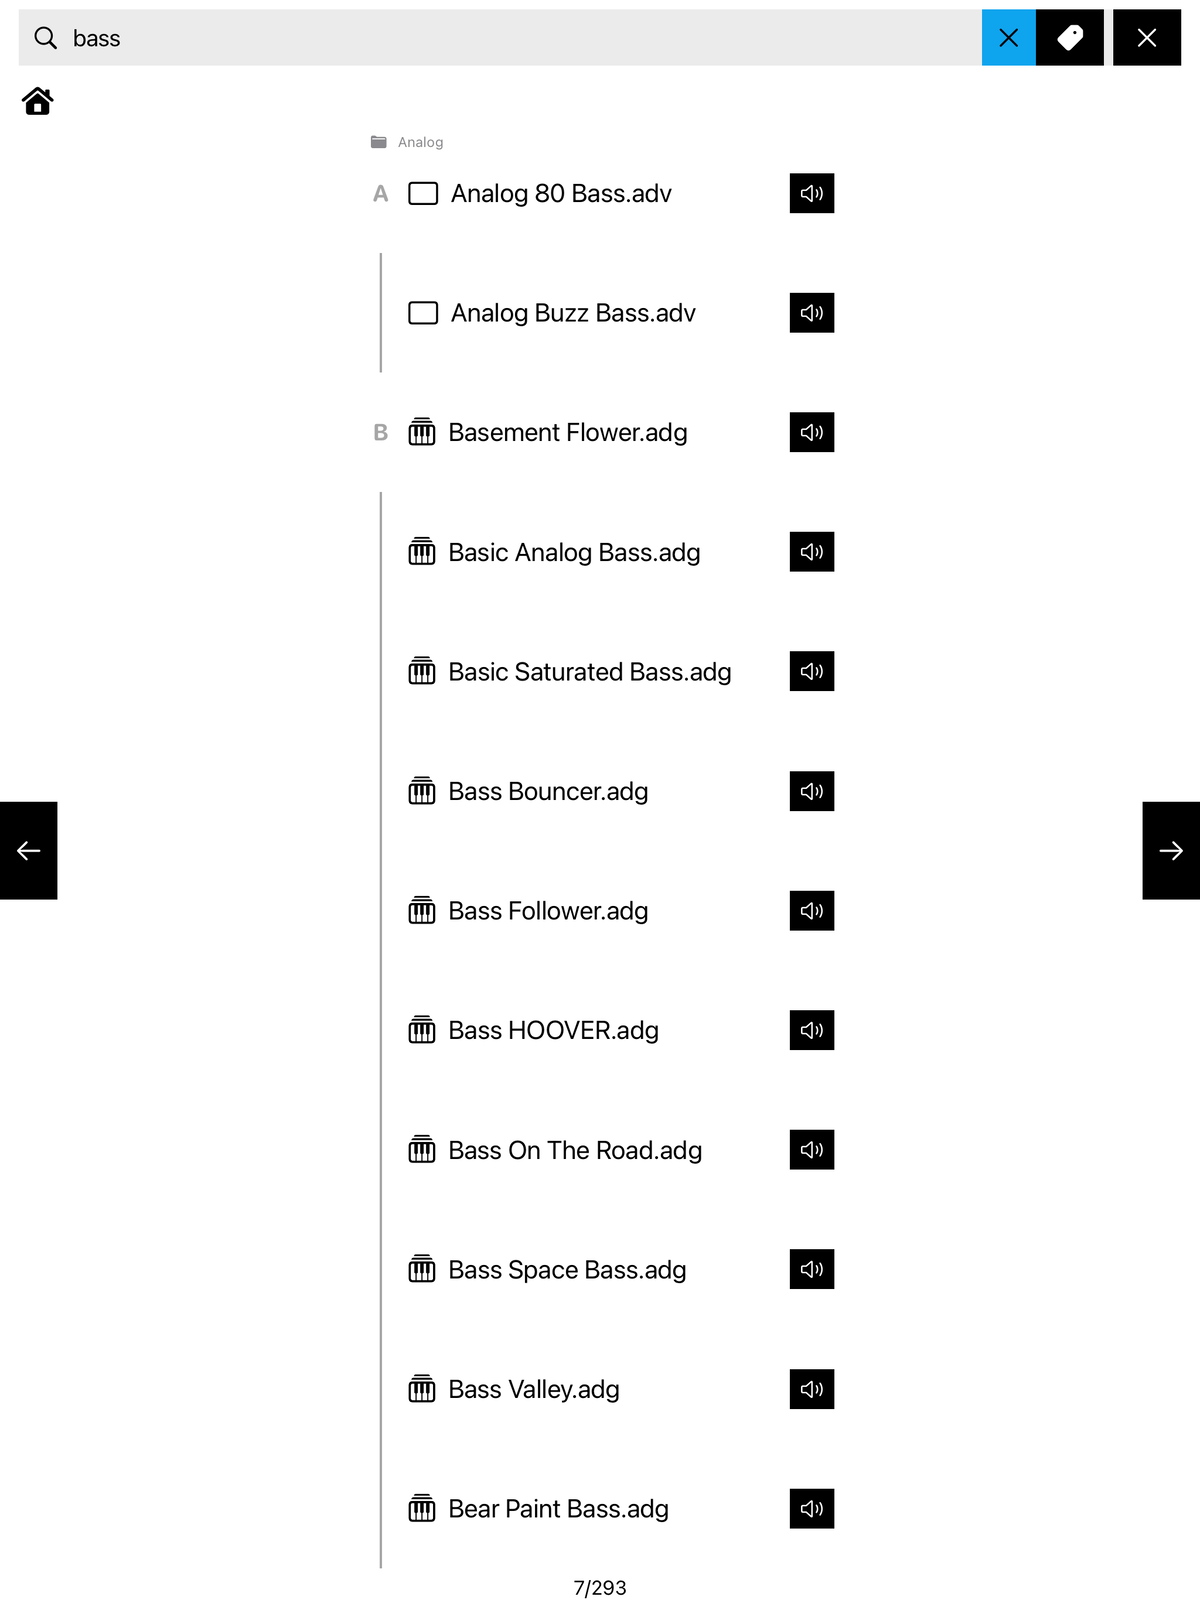
- Select a category by tapping on it. Categories are sorted alphabetically, so the list stays predictable even when Live reports additional folders.
- Some instruments, drums, effects have children, indicated by a
>symbol, to show the children tap the>. - To load a device, effect, sample, or clip simply tap on it.
- Items that can be auditioned show a speaker button. Tap it to preview the item in Live; tap it again to stop the preview.
- Use Search Live to search across Live's Browser. Tap the tag button to limit the search to a category such as Drums, Drum Hits, Samples, Instruments, or Clips. Search results can be grouped by their Live folder, and Tap shows the search progress while Live is walking through the library.
- You can navigate through the browser levels by tapping on the level in the path display on top.
- To go back and forth through the browser pages, tap the left or right arrow or swipe left or right. Hold an arrow to move through many pages quickly, or tap the page indicator to jump directly to a page.
- Tap the
xsymbol to close the browser.
Simpler
When a Simpler is selected, Tap shows its sample waveform behind the encoders in the Main bank. Sample Start, Sample End, Loop Start, Loop End, slice markers, fades, and the playhead are shown directly on the waveform.

- If the Simpler is empty, press Browse Samples to open Tap's Samples browser and load a sample into it.
- The Zoom control works in two directions: drag up or down to zoom, then drag left or right to move through the sample.
- Simpler's action controls change with Classic, One-Shot, and Slicing mode. Depending on the mode, they include Loop, Trigger / Gate, Warp, ÷2, ×2, Warp Mode, Crop / Split, Reverse, Snap, and the slice reset or clear action.
- In Simpler's Warp controls, Warp As can set the sample to 1/2, 1, 2, 4, 8, 16, or 32 beats.
3.3.2 Banks Bar
Navigate and select banks of the chosen device here.
If the selected device is a rack device, a stacked-squares symbol is available before the first bank. Pressing it opens a menu with variations and randomize options (and automation options if Automation Editing is active). Any macro with the name "Volume" is ignored by randomization. Just like Ableton Live promises—except Tap actually adheres to it (as of June 2026).

3.3.3 Encoders Section
The 8 encoders of the current bank.
- There are four types: dials, selectors (current selection with a slider underneath), on/off buttons, action buttons
- All encoders show the display value from Ableton Live
Dials:
- Activate a dial by touching it, then:
- Move up or down for normal, broad value changes.
- Move left or right for fine value changes.
- Tap watches the beginning of your gesture and locks to the first clear direction it understands. After the dial has locked to vertical or horizontal movement, diagonal wobble is ignored, which makes live parameter moves much less jumpy.
- Double-tap a dial to reset to the default value; triple-tap to reset to center (63).
Selectors:
- Activate a selector by touching it, then:
- Adjust the value of a selector by:
- moving your finger horizontal or vertical. The first direction will let you move from value to value
- tapping it once, this will go through the values one by one
- Double-tap a selector to reset it to the default value. No triple-tap.
On/Off Buttons:
- Simply tap a button to switch the value.
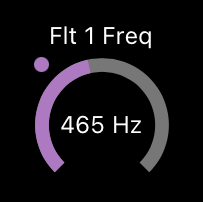
Automation
The small automation dot on an encoder tells you what Live reports for that parameter:
- A track-coloured dot means the parameter has active automation.
- A grey dot means automation exists, but it is currently overridden because the parameter was moved away from the automated value.
Automation actions appear in the Banks Bar menu and in the track context menu when they are useful:
- Global Automation re-enables automation for the whole Live Set. This is the same kind of action as pressing Live's "Re-enable Automation" button.
- Local Automation arms Tap for one touch. After choosing it, touch the encoder whose automation you want to re-enable. This is useful when one grey-dot parameter should return to automation without restoring the whole song.
- Remove Automation also arms Tap for one touch. After choosing it, touch the encoder whose automation should be removed. Tap clears that parameter's automation envelope from the playing clip on the selected track and leaves the parameter at its current value.
Hold the record button in the Footer Bar, then tap any automatable encoder to jump directly to that parameter's automation in the Step Sequencer.
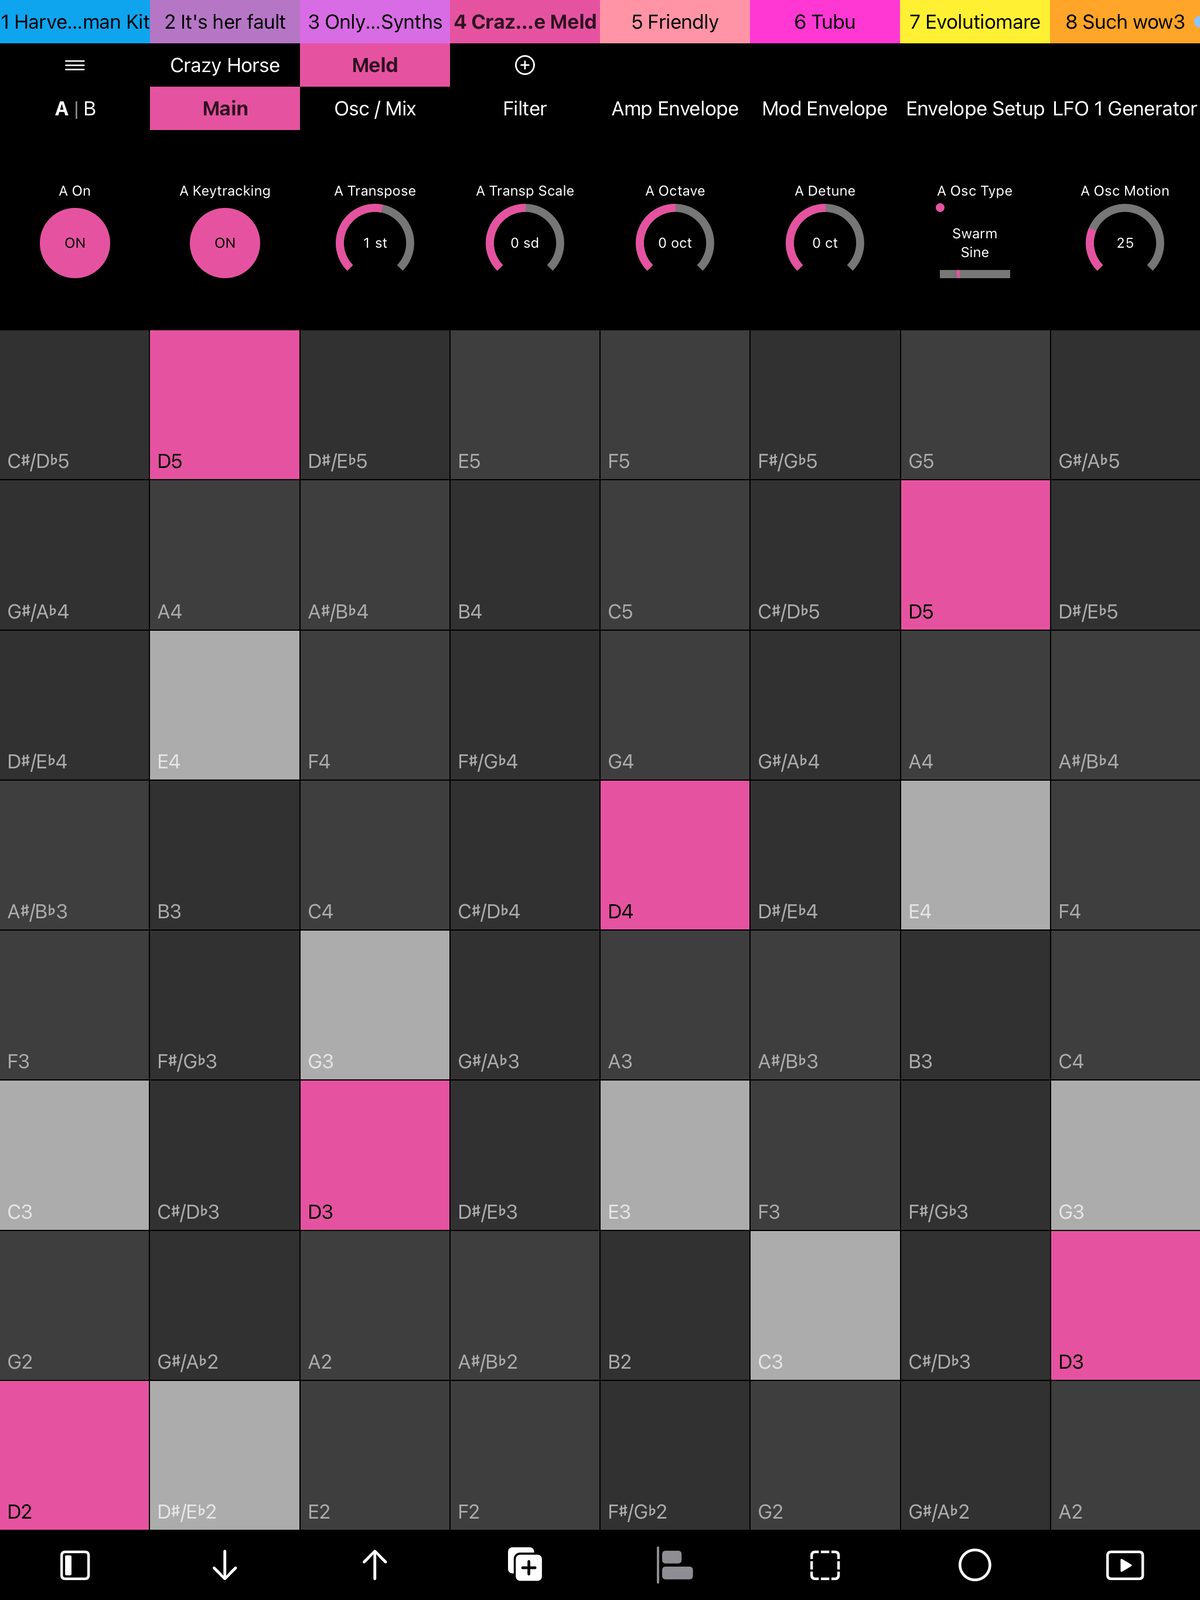
3.3.4 MIDI Grid
The MIDI grid is for playing notes (huge surprise!).
- The pads show names if you are in a drum rack, the note names if in a MIDI track.
- On iPad, Drum Racks also offer a 64 layout: the same Drum Pads behaviour across an 8×8 surface. Page 0 starts at regular Drum Rack page 0; page 1 contains the next 64 pads. The Footer Bar arrows move a complete 64-pad page at a time. Switching between layouts keeps the corresponding page group. The active Side Panel button shows 64 so it stays distinct from the regular Pads layout.
- Root notes are in a different color than the rest of the pads. If you are in a drum rack, the selected drum pad is in the channel color.
- To replace a specific Drum Rack pad, long-press the drum track in the Tracks Bar and choose Swap Drum Pad. Touch the pad you want to replace next, occupied or empty. Tap opens the Browser for that exact pad; selecting a compatible item loads it there.
- You have the option of choosing different scales, velocity modes, mod wheel, pitch wheel, layouts, and more via the Side Panel button in the Footer Bar.
- Many keyboard and pad layouts are available. You can choose separately whether initial touch height sets velocity for 5 Pads, 4ths, 8 Pads, 7 Pads, Keys, Drum Pads, and Single Pad in Settings → Initial Height Velocity. 7 Pads, Keys, and Single Pad are on by default to preserve their previous behavior; the others are off by default. Velocity Height sets how much of each pad maps from velocity 1 at the bottom to 127 at the top. It is adjustable from 10% to 90%, defaults to 80%, and centers the active range so both extremes remain easy to hit. Fixed Velocity in the Side Panel overrides initial-height velocity.
- Notes played by the playing clip are lit up.
16 Pitches
On iPad, Drum Racks and Simpler in Slicing mode have a 16 Pitches performance layout. In a Drum Rack, choose Pitches in the Side Panel. In Simpler's Slicing mode, tap the layout control to cycle between 64 Pads, 16 Pitches, and Seq.
The lower-left 16 pads select and play sounds from the current Drum Rack or slice page. The lower-right 16 pads play the selected sound melodically, starting from C2 and moving from left to right, then bottom to top. In-Key follows the chosen root and scale; Chromatic moves in semitones and marks roots, scale notes, and notes outside the scale. Use the Side Panel for root, scale, and In-Key/Chromatic. The Footer Bar has two navigation pages: one for Drum Rack or slice pages, and one for the pitch octave.
The upper-left field controls fixed Velocity vertically and Slide horizontally. The upper-right field controls the first two visible encoders: left/right changes the first encoder and up/down changes the second. The fields keep their position after you lift your finger.
The pitched pads always use fixed velocity. Move up and down on a held pitch for per-note Pressure, or left and right to bend continuously toward the neighbouring pitch without retriggering it. This layout uses MPE automatically even if MPE Pads is off, but Live's MPE input option must still be active. Use Record or Capture MIDI to keep the performance; Live does not expose the captured per-note expression to Tap for later editing.
MPE Pads
Turn on Settings → MIDI Pad Expression → MPE Pads to make every playable pad layout expressive, including Drum Pads and Drum Racks. Each touch can then send its own expression:
- Touch height sets the note's initial velocity when Initial Height Velocity is enabled for that layout. Otherwise Tap uses the fixed velocity.
- Move left or right for per-note pitch bend. Crossing into another pad bends continuously instead of retriggering the note.
- Move up or down to send the selected Vertical Expression: Pressure or Slide (CC74).
Tap uses the standard MPE lower zone, giving you up to 14 independently expressive touches while keeping channel 16 free for the Remote Script.
Before playing, activate MPE for Tap's input port in Live's MIDI Settings. Tap cannot detect Live's separate MPE input-port switch. Tap configures every MPE member channel with the standard 48-semitone per-note pitch-bend range. External hardware must support that range for cross-pad bends to land on the correct pitches.
The options below appear only while MPE Pads is enabled:
- Note Pitch Bend — Auto / On / Off: Auto is the default and enables per-note bend when the current Tap Remote Script confirms MPE support. On always sends per-note pitch bend. Off changes horizontal movement back to pad-by-pad glissando while keeping the selected vertical expression.
- In-Tune Location — Finger / Pad: Finger is the default and treats the place where the finger first touches as zero pitch bend. Pad always uses the center of the pad as zero, so touching away from the center can begin already bent.
- In-Tune Zone Width: corresponds to Push's In Tune Width (internally called its flat zone). It controls how much space around each note's reference point remains exactly in tune. The default is 35% pad. At 0%, pitch changes continuously across the whole distance; larger values hold each exact note across more of the pad and leave a shorter transition between notes. Drum Rack Pads, 64, and Single all use the 8-column 64 layout as their horizontal pitch ruler: moving by one guide cell bends by one drum-pad semitone. Other layouts reach the neighbouring pitch after one visible pad width.
- Vertical Expression — Pressure / Slide: chooses which per-note MPE message vertical movement sends. Pressure is the default; Slide sends CC74.
- Vertical Start — Finger / Location: Finger is the default. It sends zero when the note begins and measures subsequent vertical movement relative to that first touch. Location derives the initial expression value from the height at which the pad is touched.
- Vertical Height: controls how far the finger moves vertically through the full expression range. Its 100% pad default follows the current pad height.
When Note Repeat is active, horizontal per-note pitch bend stays available. Vertical movement is deliberately routed only to Live's repeat pressure-to-velocity control instead of also sending the selected MPE vertical expression, so the behaviors cannot collide. If Pad Pressure is off in Repeat Options, vertical movement does nothing while Repeat is active. Switching Note Repeat off restores the selected MPE vertical expression automatically.
3.3.5 Step Sequencer
Step sequence away!
- Add notes by tapping, and move them by dragging. Dragging slowly enables non-quantized fine movement.
- Drag up or down in the little rectangle at the end of a note to change the velocity of that note.
- Drag left or right in the little rectangle at the end of a note to change the length of that note.
- Each note you add will have the velocity set in the Side Panel (see button 1 in the Footer Bar).
- Without Performance Features: Drag horizontally on the background to navigate through the pages of the Step Sequencer. With Performance Features you only change pages with the Footer Bar arrows.
- Without Performance Features: Drag vertically first on the background to activate Selection Mode. With Performance Features enabled you can simply drag on the background to activate Selection Mode.
- Long press on a note to also enter Selection Mode (or if already in Selection Mode, this will add/remove the note from the selection).
- Change the drums page or octave using the Side Panel, or the up/down buttons in the Footer Bar - available in landscape mode or when Performance Features are enabled (see Footer Bar button 2).
- To select a drum pad, long press on an empty step in the Step Sequencer.
- Pinch in the sequencer to change the grid size. Pinch open for a finer grid, down to 1/32. Pinch closed for a wider overview, up to whole-note pages. The same gesture works while editing automation.
- You can page further than the current clip length. This lets you move into empty space beyond the clip end, add notes or edit longer automation, and then extend the musical idea instead of being trapped at the old end marker.
Let's dive into the Tap Step Sequencer in detail:
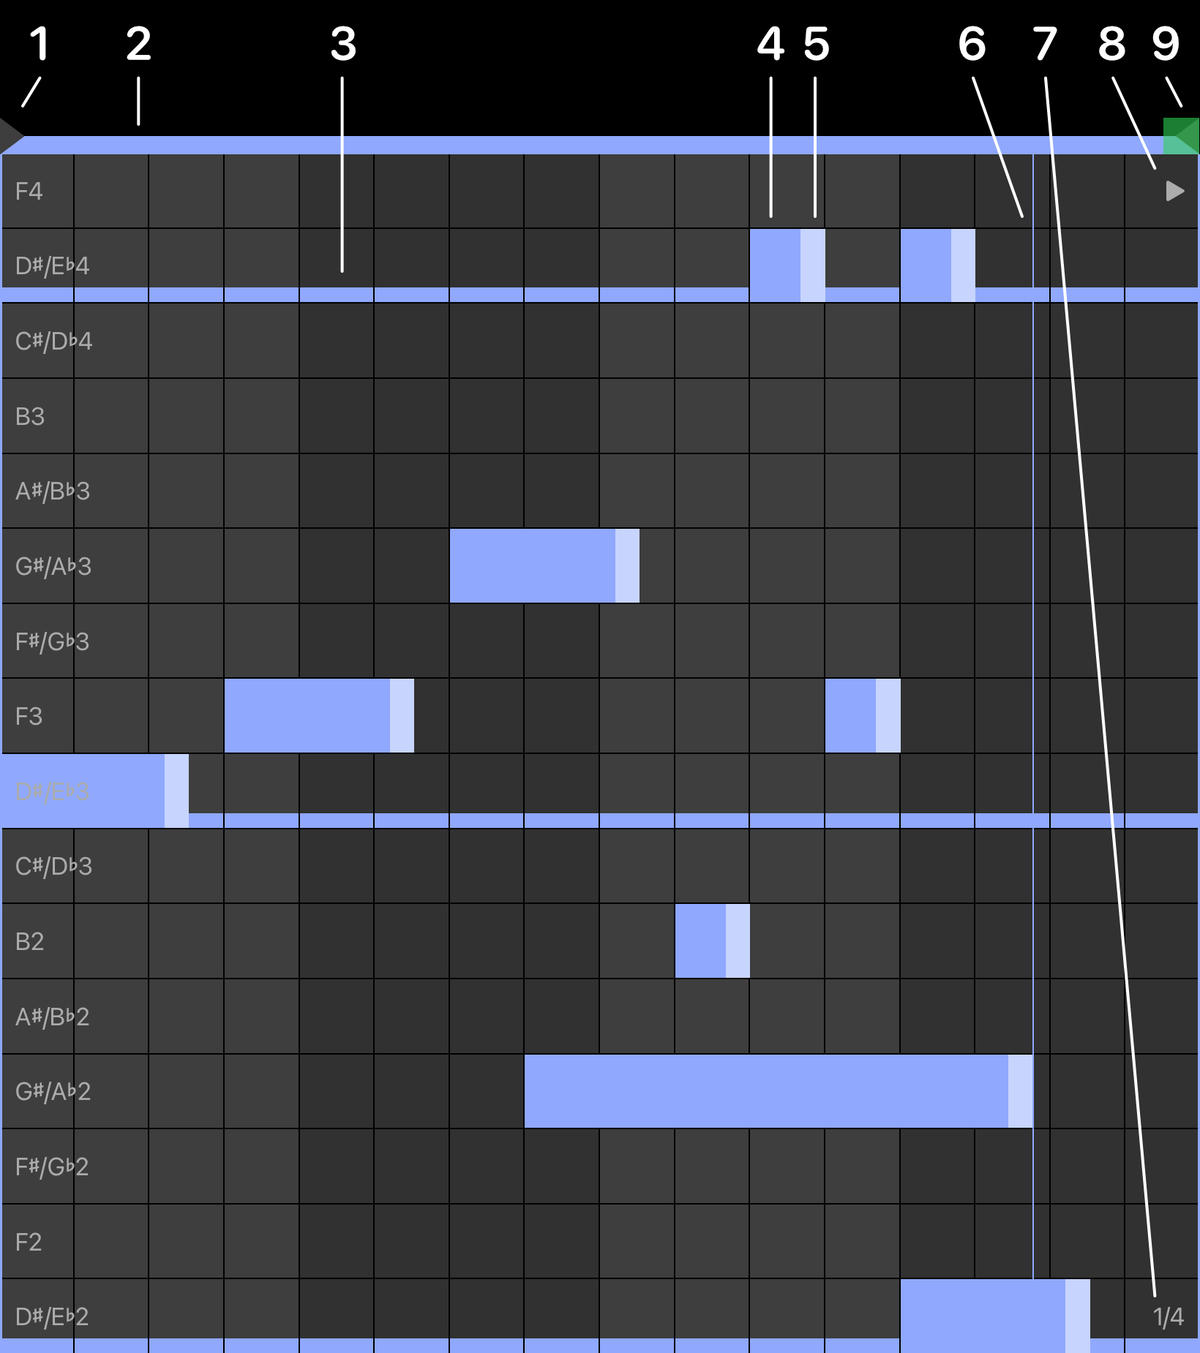
- The Start and Stop are marked with dark triangles.
- The looped section is indicated by the band on top of the step sequencer and two lines at the start and end of the loop, all in the color of the track. When Loop is off, these markers remain visible in gray.
- Octave starts are marked with a horizontal line in the background. For drums, it is the selected drum pad that is marked.
- Notes are shown as rectangles in the track’s colour. Each note also has a slightly darker background rectangle behind it for visual contrast.
Velocity is represented by how much of the note is filled from the bottom up: a fully filled bar corresponds to velocity 127, while a barely filled bar represents velocity 1.
Probability is represented by colour saturation: the more saturated the note’s colour, the higher the chance it will be played. Fully saturated means 100% probability. - Each note has an end rectangle. Drag the small rectangle at the end of a note horizontally to adjust its length, or vertically to adjust its velocity. This gesture can be a bit tricky, which is why we added an Edit Overlay. When you select one or more notes, the Edit Overlay becomes available. There, you can edit length, velocity, probability, and more.
- The third track-colored line indicates the playing position.
- These numbers show current page followed by total number of pages for this clip.
- Shows clip playback status: solid play symbol
▶means this clip is playing. An outline▷means a different clip on the same track is playing. A play symbol with a dash means no clip on this track is playing. - The Lil Green Helper rectangle. You can move the green rectangle by dragging it. Tap on it to open the menu. In the menu, you can move the loop and perform other useful actions like changing the drums page or octave. You can also change octaves/pages by using the side panel.
When you tap the Lil Green Helper rectangle, you will see the following menu:
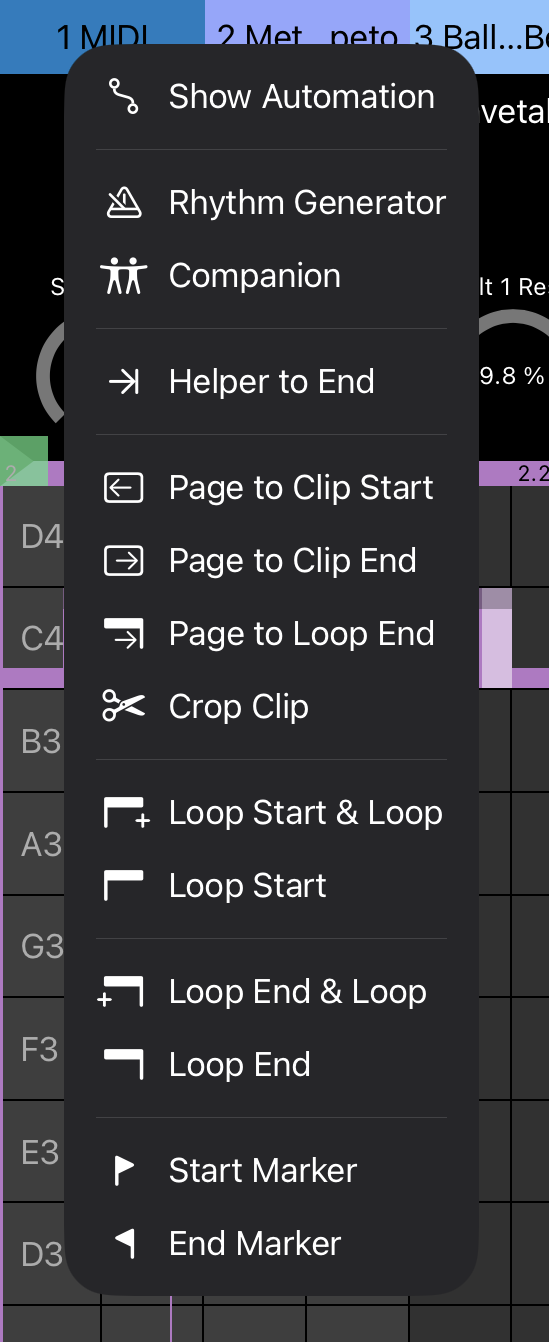
- Move helper to End/Start: Use these if you don't want to drag the Lil Green Helper manually. Moves the green rectangle to the start or end of the sequencer window.
- Page to Clip Start/End: Moves the sequencer page to the start/end of the clip.
- Page to Loop Start/End: Moves the sequencer page to the start/end of the loop.
- Crop Clip: Crops the clip to the loop length.
- Move Loop Start/End & Loop: Moves the start/end of the loop and the whole loop (this means no change in loop length) to where the Lil Green Helper rectangle sits. With Loop off, these become Start/End Marker & Range and move the complete playback range.
- Move Loop Start/End: Only moves the start/end of the loop to where the Lil Green Helper rectangle sits. This will change the length of the loop. With Loop off, these are called Start/End Marker; Tap moves the visible playback boundary together with Live's hidden loop boundary so it is not clamped.
- Start/End Marker: When Loop is on, moves the independent start/end marker to the Lil Green Helper rectangle. These separate commands are hidden when Loop is off.
- Loop On/Off: The final menu item switches looping for the selected MIDI clip on or off. The label and symbol show the current state.
The Lil Green Helper menu also gives access to Automation Editing, the Companion, the Rhythm Generator, and Flin, depending on the selected clip and track.
3.3.5.1 Selection Mode
Enter Selection Mode by either selecting notes or long-pressing on a note. Selected notes and range are highlighted in light-blue.
Selections work the same way as in Ableton Live. You can add or subtract from a selection by dragging the selection square accordingly. You can also long-press on a selected note to deselect it. You can also add and subtract from the range of the selection, without selecting additional notes. This is important for duplication and copy-pasting.
You can move around selected notes by dragging one of them. You can also adjust the velocity and the length of all the selected notes by simply editing one of them. As this can be finicky, especially when playing live, we have added an Edit Overlay for easy and quick editing (see below).
Info: You can't undo and redo selections.
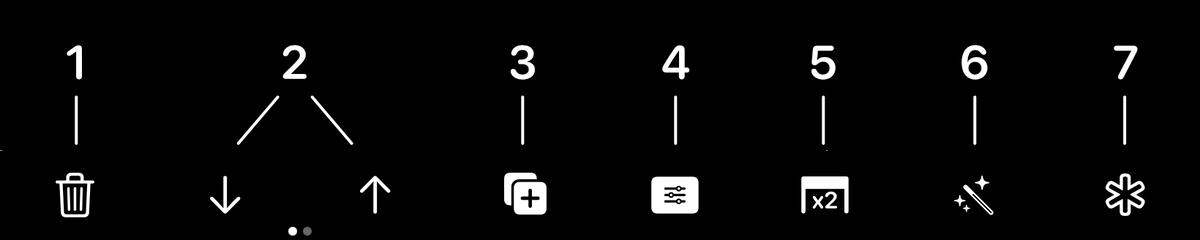
Once in Selection Mode, there are several new Footer Bar buttons available, here are the new ones:
- Trash: Deletes the selected notes.
- Edit Overlay: Opens and closes the edit overlay.
- Modulation Menu: Opens and closes the modulation menu.
- Selection Menu: Opens and closes the selection menu.
Edit Overlay
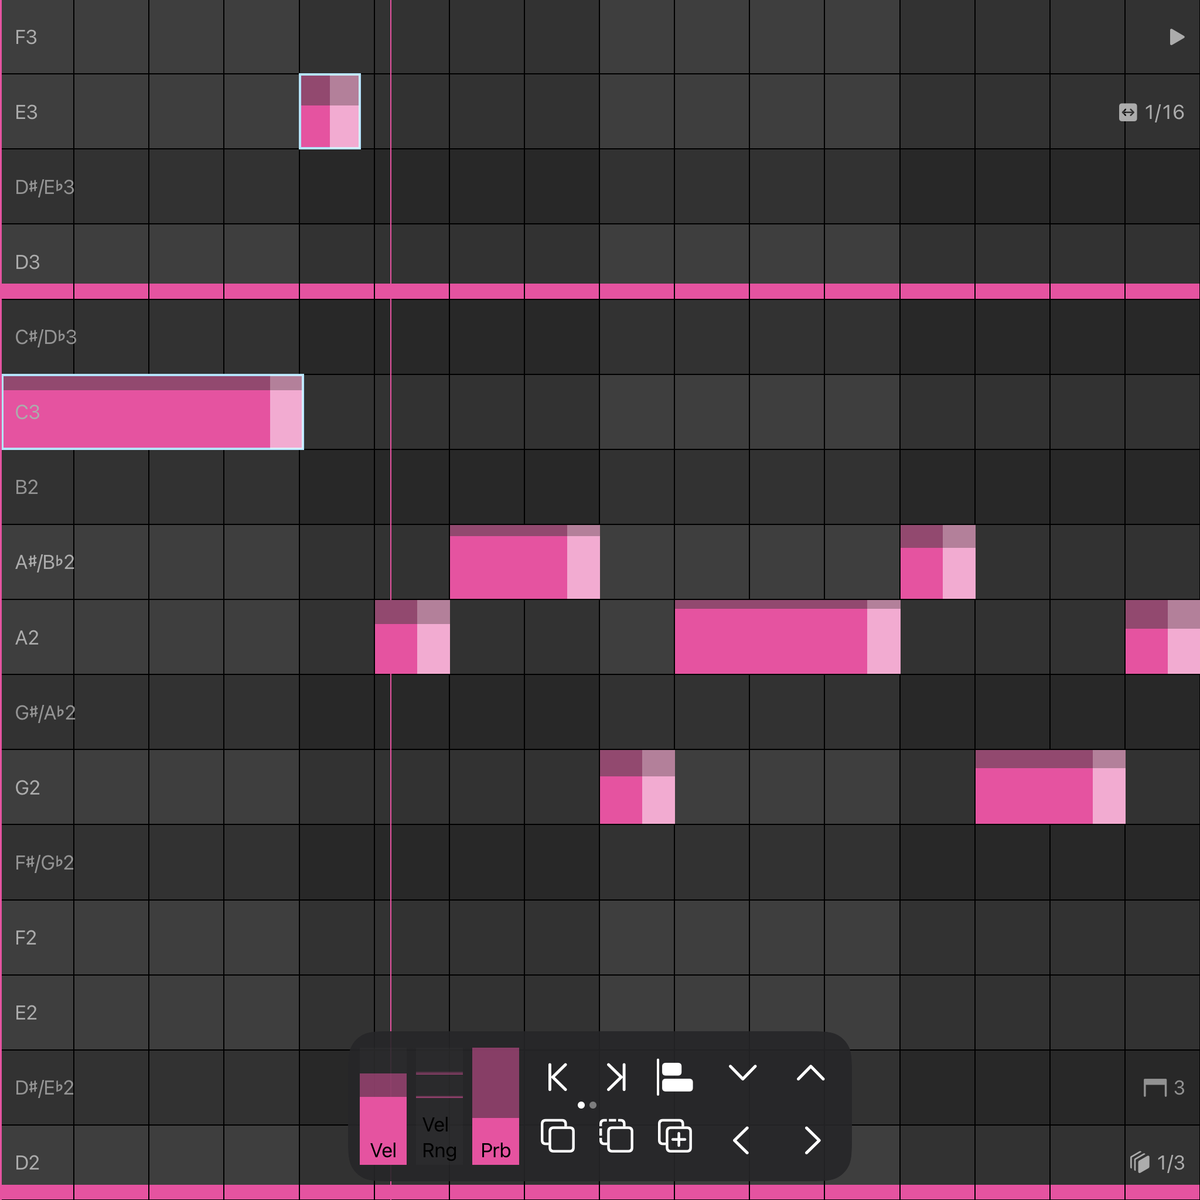
- Drag Vel to change the selected notes' velocities, Vel Rng to set their velocity deviation, and Prb to change their probabilities. Tap sends each combined change to Live when you let go.
- Shorten and Lengthen change every selected note by one grid cell. Long-press changes them by one beat. Tap or swipe the two-dot page indicator to reveal
/2andx2instead; these divide or multiply the note lengths by two. - Quantize aligns the selected notes. Long-press it for the detailed grid, strength, and swing settings.
- Copy keeps the notes and range in Tap's copy buffer. Cut does the same and removes the originals. Paste at the selected range with the Paste button, or tap any grid cell to choose a new start. You can move to another clip with the Play Menu before pasting.
- Duplicate copies the selected notes to the end of the selected range.
- The left and right arrows move the notes by one grid cell; long-press moves by one eighth of a grid cell and continues repeating. The up and down arrows move by one scale step, or by one octave when held.
Modulation Menu
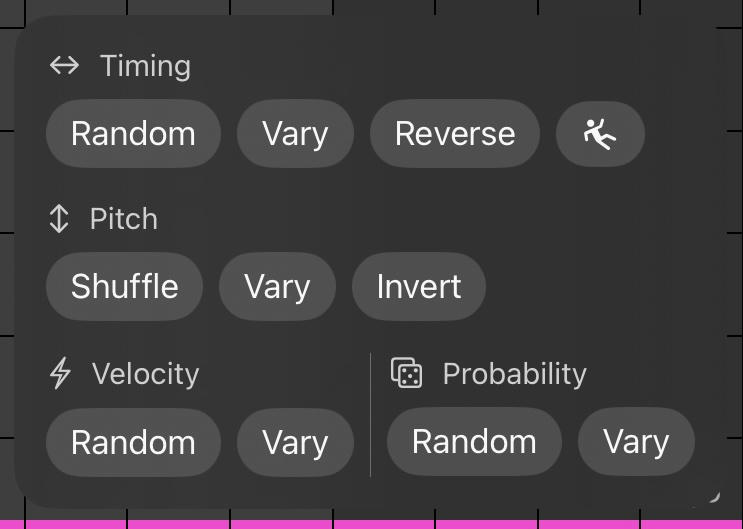
There are four modulation categories:
- Timing
- Random will get you random timings inside the selected range.
- Vary will vary the timing of the selected notes by up to 4 grid cells
- Reverse reverses the timing of the selected notes inside the selected range.
- Falling person will humanize the timing.
- Pitch
- Shuffle will shuffle the pitches of the selected notes.
- Vary will vary the pitches of the selected notes by up to 4 semitones.
- Invert will invert the pitches of the selected notes.
- Velocity
- Random will randomize the velocities of the selected notes.
- Vary will vary the velocities of the selected notes by up to 30% or so.
- Probability
- Random will randomize the probabilities of the selected notes.
- Vary will vary the probabilities of the selected notes by up to 30% or so.
Selection Menu
The notes Selection Menu is simple but powerful in combination with the Modulation Menu.
You can:
- select all notes
- invert the selection
- randomize the selection
3.3.5.2 Automation Editing
Automation Editing places a Live clip envelope directly over the Step Sequencer, so the parameter movement stays aligned with the notes that drive it. Open the Lil Green Helper and choose Show Automation, or hold Record ◯ in the Footer Bar and tap an automatable encoder in the Encoders Section.
Tap first selects a parameter that already has automation. If there is none, it uses the first automatable parameter in the current bank. To choose another one, press Select Parameter (dial symbol) in the Footer Bar, then touch its encoder.
The automation line is drawn over the sequencer:
- A solid line with dots means the clip has automation for the selected parameter.
- A dashed horizontal line means there is no envelope yet; the line shows the current parameter value.
- The selected parameter is marked with corner brackets around its encoder.
Work directly on the envelope:
- Tap the dashed line, a line segment, or the visible automation curve to add a point.
- Drag a point to move it in time and value. Time snaps to the current sequencer grid.
- Drag a line segment up or down to change its bend direction and amount. Drag left or right to move where the bend happens. Tap keeps the real Bézier curve instead of filling it with unnecessary points.
- Tap a point when no automation points are selected to remove it.
- Drag on the background to select automation points. Selected points get a light-blue ring.
- Drag one selected point to move all selected automation points together.
- Tap the background to clear the selection.
- Turn on Pencil in the Footer Bar to draw continuously. One uninterrupted stroke becomes one Undo/Redo action in Live.
Automation remains available across the clip's automation timeline, including available points before the Start Marker or after the End Marker. Start, End, and loop markers remain playback and editing references rather than destructive automation boundaries.
While Automation Editing is visible, the Footer Bar has a few automation buttons:
- Add Curves (
⊕): opens the Curve Generator for the selected parameter. Long-press the same button to open the Encoders View. - Select Parameter: arms Tap for one touch. Touch the dial you want to edit.
- Pencil: turns continuous automation drawing on or off.
- Exit Automation: the door button leaves Automation Editing and returns to the normal sequencer controls.
When automation points are selected, the Footer Bar changes again:
- Trash deletes the selected automation points.
- Duplicate copies the selected span to its end. Tap overwrites the destination range and places the first copied point exactly at the original selection's end, so repeating ramps and curves join cleanly.
The Lil Green Helper also contains the envelope-wide commands:
- Automation Loop End gives the selected parameter its own loop length. Notes can keep looping at one length while the automation runs at another.
- Clear Automation removes the selected parameter's envelope.
- Clear All Automation removes the envelopes for the parameters in the current device bank.
- Unfold Clip turns a clip with decoupled automation into one normal longer clip. The repeated notes become real clip content and Tap removes the folding metadata.
Decoupled automation is ideal for slow filter movements and polymetric modulation. A 1-bar drum loop can, for example, run under an 8-bar filter sweep. An A before the loop length at the bottom-right of the sequencer shows that you are looking at the automation length.
Curve Generator
The Curve Generator replaces the selected parameter's complete automation envelope with a repeating shape. Choose Sine, Dropping Ball, Triangle, Square, ascending or descending Saw, rising or falling Envelope and S ramps, Wander, or S & H (Sample & Hold).
Its four controls normally set Rate, Phase, Top Space, and Bottom Space. The synced half of Rate runs from 1/32 through the musical divisions—including 1/3 and 2/3—to 4 bars. Continue past the centre for free time in seconds or milliseconds. Phase moves the shape through its cycle. Top and Bottom Space keep the result away from the parameter's limits. Tap an already selected Wander or S & H shape again to create a new variation.
For Dropping Ball, those first two controls become Drop Rate and Bounce. Drop Rate is the duration of one complete fall and bounce sequence, so shorter musical rates can place several drops in one bar. Bounce controls how many rebounds survive, how high they rise, and how quickly their spacing contracts.
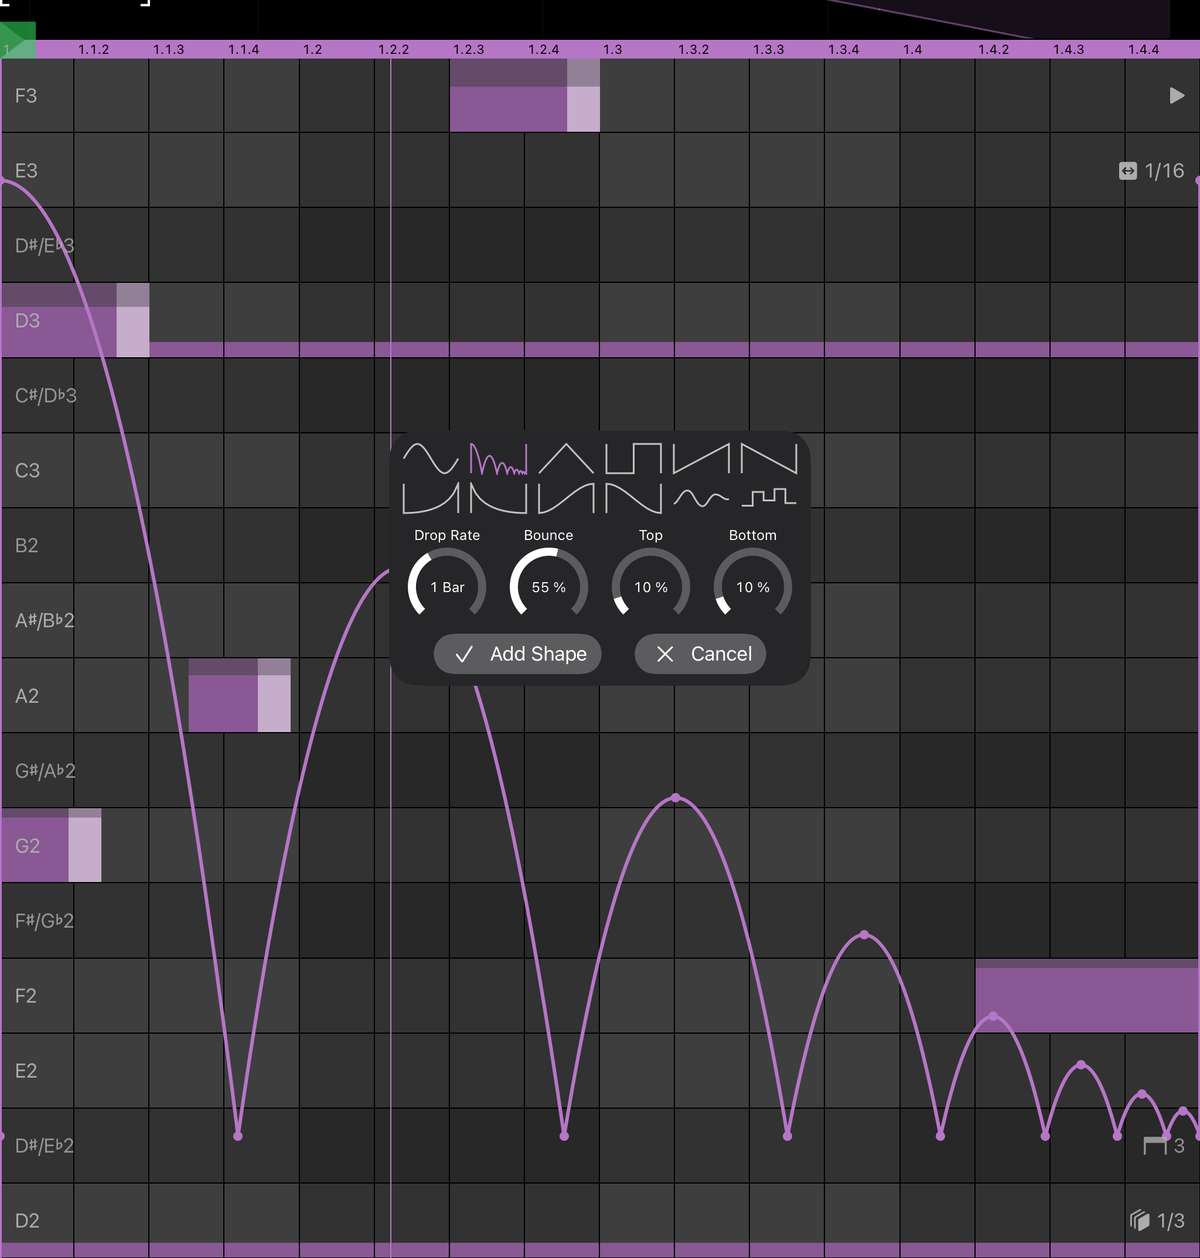
Changes appear immediately as a preview but are not sent to Live yet. Press Add Shape to replace the available clip-automation timeline in one Live Undo step, or Cancel to restore the untouched envelope.
3.3.5.3 Companion
The Companion turns the visible source loop into a longer musical structure. Tap calls this "mutator" in some older code, but in the app and the manual it is the Companion.
Open the Lil Green Helper menu and choose Companion. Tap uses the current loop as the source section, called A, then writes generated sections after it. The source loop stays the musical identity. Other sections are variations, bridges, hooks, fills, breaks, or returns based on the selected pattern and algorithm.
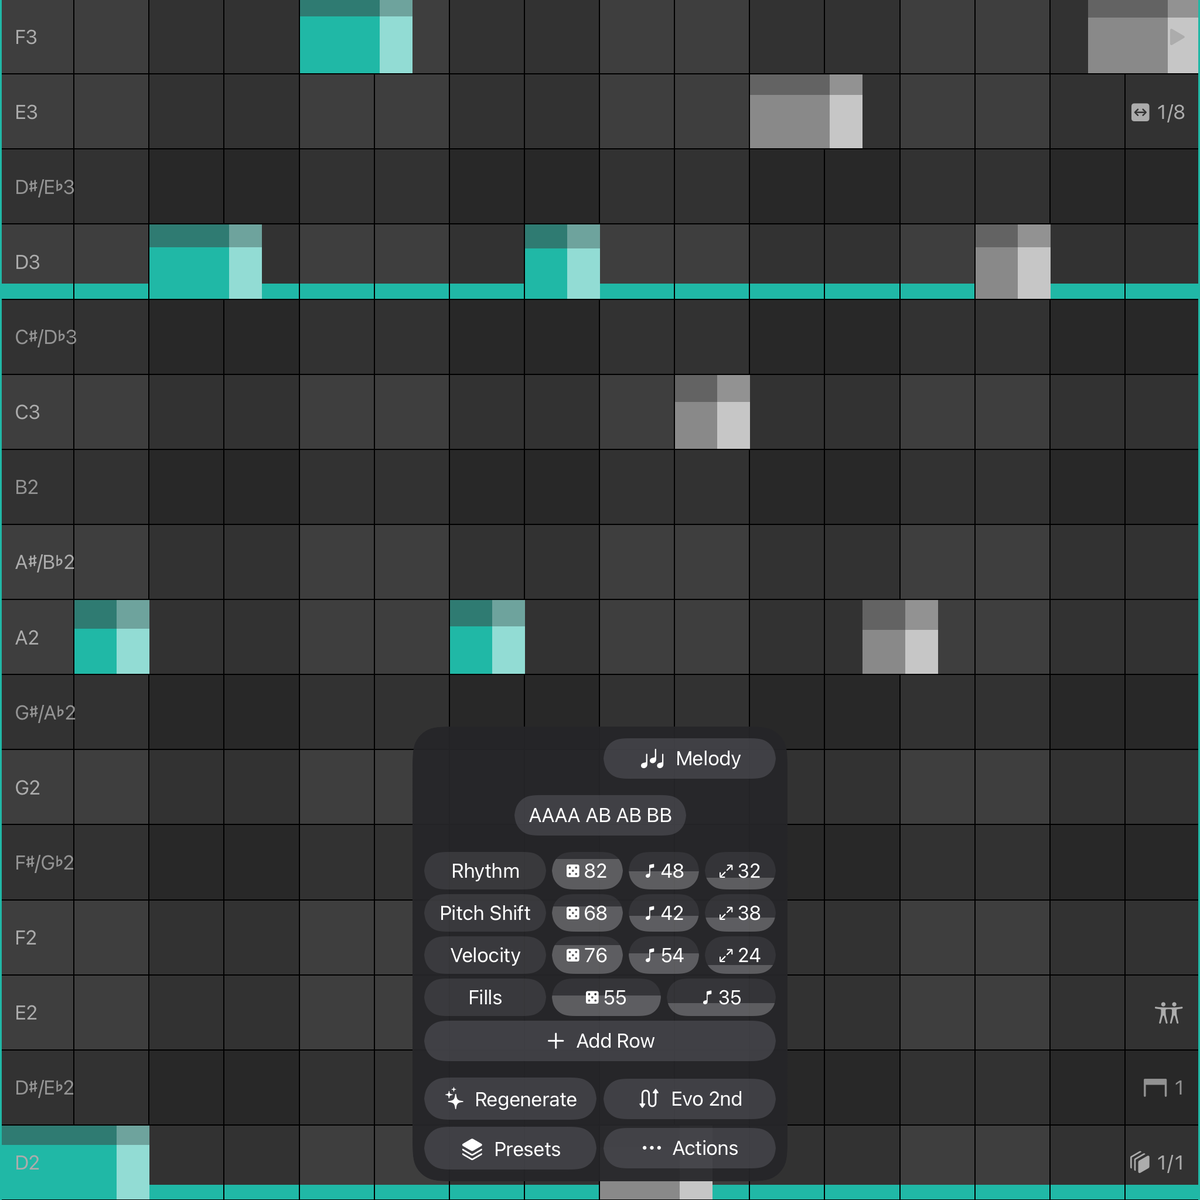
Companion clips are still editable. While a clip is in Companion mode, the generated structure is stored with the clip. You can:
- Start to create the Companion structure.
- Apply after changing settings that are waiting to be written.
- Regenerate to make a fresh version with the same settings.
- Commit to turn the generated structure into a normal MIDI clip.
- Exit to remove the generated sections and return to the original source loop.
After the Companion has been started, the Footer Bar shows a Companion symbol. Tap it to hide the Companion overlay. Tap it again to show the overlay again.
The main controls are:
- Melody / Rhythm switches whether the Companion mutates melodic material or drum/rhythm material. In Rhythm mode, choose the target drum lanes or note rows first.
- Pattern chooses the song shape, such as
AABA,AABB,ABCD, or longer forms and special algorithms. - Depth / Variation sets how far Tap is allowed to move away from the source.
- Regeneration controls whether the Companion stays static or evolves while the clip plays: Static, every pass, every 2nd pass, every 4th pass, or probability-based 10%, 25%, 50%, or 75% evolution.
- The operation rows decide what the Companion is allowed to do and in which order. Tap applies the rows from top to bottom after the selected pattern role has shaped the section.
Each operation row has:
- an operation name. Tap it to open the operation picker.
- a dice value. This is the chance that the whole row is active for a generated section.
- a note/probability value. For most operations this chooses how many notes are affected.
- a range value, where the selected operation needs one. This controls how far timing, pitch, velocity, or gate changes can move.
You can add rows, and you can long-press an operation row to move it up, move it down, or duplicate it. The overlay also has Presets for loading and saving Companion settings. Presets can be imported, exported, reordered, and organized into folders in Settings -> Companion Presets.
Operation details:
- Fills: probability controls fill amount and intensity.
- Simplify: probability controls the amount of notes considered for simplification and removal, with weaker or shorter notes usually removed first.
- Rhythm: note % selects notes; range % controls timing shift distance.
- Notes Shift: note % selects pitches or pitch groups; range % controls how far the selected pitch groups can shift within the loop.
- Add: probability % controls how many additions are attempted from the existing motif or pitch groups. Velocities, durations, mute state, and probabilities are sampled from existing notes.
- Remove: probability % controls the amount of notes selected for removal.
- Velocity: note % selects notes; range % is plus/minus up to that percent of 127, capped to 1...127.
- Gate: note % selects notes; range % controls random gate scaling. Low range is subtle, around 50% can roughly halve or double durations, and 100% can reach very short or much longer gates. Gate is clamped before the next same-pitch note.
- Pitch Shift: note % selects notes; range % expands from nearby scale moves to wider octave-scale movement. In Rhythm mode, range expands the nearby drum target pool.
- Octave: note % selects melody notes and shifts selected notes up or down one octave. It is not available in Rhythm mode.
- Add+Pitch: combines pitched movement with additions, using the row amount for both parts.
- Loop Shift: rotates the whole loop timing.
- Reverse: reverses selected note timing inside the selected span.
- Invert: mirrors selected pitches. In Rhythm mode, it mirrors within the selected target lanes.
- Pitched Add: adds new notes on nearby scale notes, or nearby selected target lanes in Rhythm mode.
- Duplicate: copies selected notes or phrases to another position in the loop.
- Phrase Shift: shifts a selected phrase together in pitch, or through selected target lanes in Rhythm mode.
- Preserve: brings some original source notes back into the generated section.
Pattern roles:
Ais the original source loop. It is either unchanged or only very lightly touched.A'andA''are close variations. They keep the identity but add small note, timing, velocity, or repetition changes.A'''is a stronger variation with bigger rhythm and register movement.ABis a transition section, often end-weighted with pickups, fills, or a short break.Bis contrast. It may be sparser, denser, inverted, displaced, or register-shifted.B'is a variation ofB.B2is an alternateB, generated from the same sourceAwith the same mutator settings asB, not from the already-generatedB.Cis the hook or refrain. It tries to feel more stable and memorable.D,E, andFare chained mutations, each generated from the previous letter rather than always fromA.C2is a special second mutation ofC.Fillleads clearly into the next section.Breakreduces density and energy.Dropbrings the energy back with stronger timing and velocity.
Pattern presets:
ABgives one original pass and one contrast pass.AABAmakes a compact question-and-return phrase.AABBrepeats both the original and the contrast.A A B B B2 B2repeats the source and contrast, then adds an alternate contrast.A A B B2makes a short form with two different contrast passes.A A B B A A B2 B2returns to the source before introducing the alternate contrast.AAAA BBBBcreates a clear block of source material followed by a clear block of contrast.AAAA AB AB BBis the default. It develops the idea without an abrupt jump.ABCD,AABCDE,AAAABCDE, andAABBCCDDare chained mutations.A B A B C Balternates source and contrast before a hook-like section.A A' A'' B C Adevelops the source, visits a bridge and hook, then returns home.A B C D C C2 B Atravels away from the source and then walks back.A A A' A' B Fill A' Abuilds tension and snaps back.A A A' A' B Fill C C A' Agives a verse, bridge, refrain, and return shape.A A' A'' Fill B B' Break C Drop Ais a longer tension and release form.A A A A' A' B Fill C C B Fill C C A' Ais built for longer live-performance phrases.
Special algorithms:
- Verse Weaver expands a motif gently, repeating nearby scale movements so the result feels like a verse variation rather than a new part.
- Motif Ladder moves the motif up and down the scale in a ladder shape. It is good for arpeggios, hooks, and patterns that should climb without losing their original rhythm.
- Sparse Echo keeps more space, removes some density, and adds short echo-like replies. It is useful when the source is too busy or when you want a delayed answer to the phrase.
- Chorus Lift raises the energy with upward scale movement, velocity lift, and occasional octave reinforcement. It aims for the "same idea, bigger" feeling.
- Middle Eight creates contrast with more timing displacement and longer note lengths. It is useful for a section that should feel like it left the main loop for a moment.
- Tension Break pushes notes upward, shortens or tightens timing, and adds energy before a return.
- Skylight Hook creates a bright, stepwise melodic hook with a slight upward bias.
- Glass Steps is crisp and sequenced, with more repeated upward step movement and a little extra velocity.
- Nocturne Line keeps the line lower and more restrained, with smaller downward movements.
- Modal Drift turns source notes into scale-aware chord movement. A single-note source can become triads that drift through the selected scale.
- Circle Resolve is another chord generator, but with a stronger feeling of movement and return. It may add an extra chord tone for more colour in stronger sections.
3.3.5.4 Rhythm Generator
The Rhythm Generator writes a rhythm into one note lane. In a drum track, it targets the selected drum pad. In a melodic MIDI track, it targets the selected note row. Both are indicated by the little track color line at the start of the row. While the overlay is open, tap a row in the sequencer to choose a different target.
Open Rhythm Generator from the Lil Green Helper menu. The overlay shows the target lane at the top. With Auto off, adjust the controls and press Generate. With Auto on, Tap updates the lane automatically as you change settings.
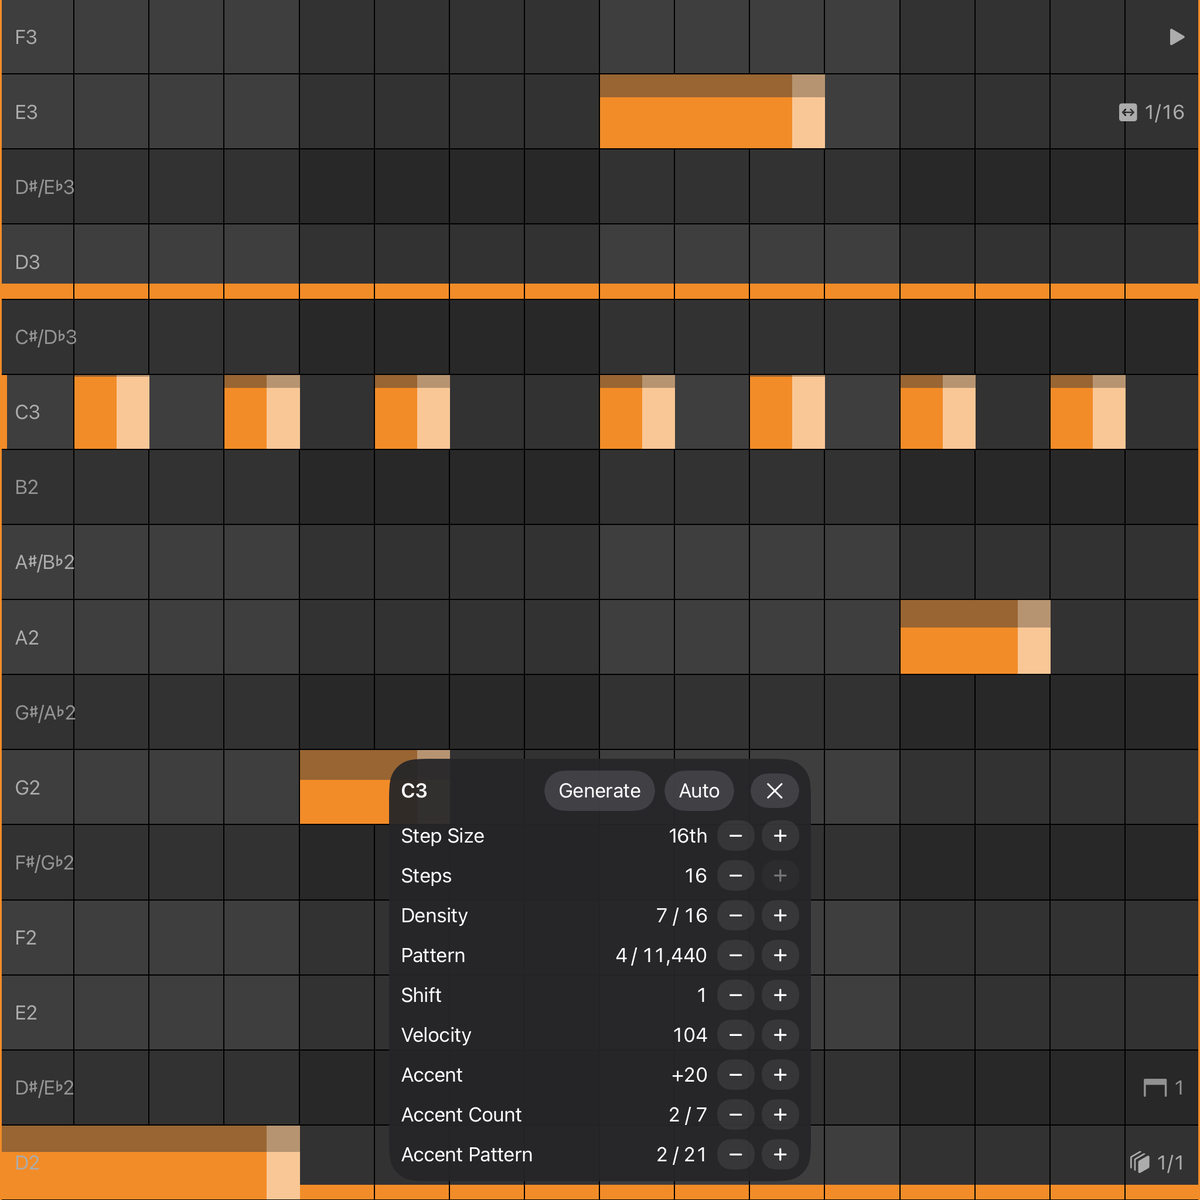
The controls:
- Step Size chooses whether the pattern is built from 1/4, 1/8, 1/16, or 1/32 steps.
- Steps chooses the number of slots in the pattern, up to 16.
- Density chooses how many of those slots contain notes.
- Pattern chooses one exact rhythm from all possible rhythms for the current Steps and Density. You can use the plus/minus buttons, long-press to move faster, or tap the number field and type the pattern number directly.
- Shift rotates the rhythm forward or backward.
- Velocity sets the base velocity.
- Accent sets how much louder accented notes are.
- Accent Count chooses how many hits are accented.
- Accent Pattern chooses which of the hits receive the accent.
Tap calculates the full set of possible hit patterns for the current Steps and Density. For example, 16 steps with 4 hits produces many possible placements. Tap sorts them musically by favouring even spacing, avoiding long runs of consecutive hits, and preferring patterns that begin on the downbeat. Accent patterns are calculated separately from the hit pattern, so you can keep the same rhythm and move only the accents.
Generating replaces the notes on the target lane inside the current loop. Other note lanes are left alone.
3.3.5.5 Flin
Flin is Tap's clip-backed generative sequencer, inspired by the original monome Flin. Sixteen independent streams fall through the grid at different rates. Each stream has its own pitch or drum pad, length, velocity, and probability. The Tap MIDI Remote Script writes the result into a normal Live MIDI clip, so Live remains the authority for playback and note data.
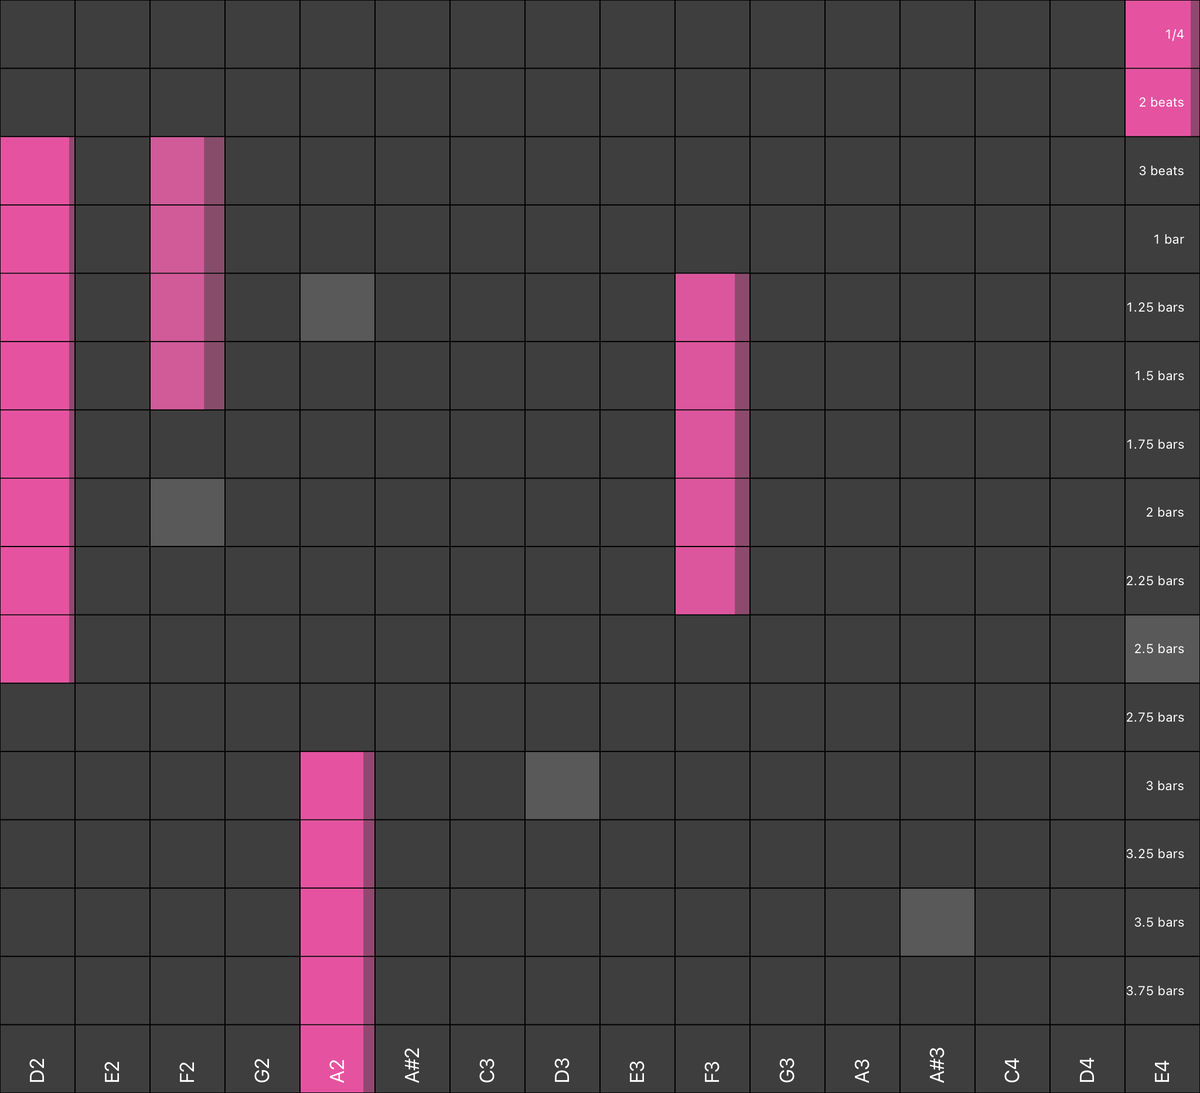
To start Flin:
- Install the matching Tap MIDI Remote Script and connect Tap to Live.
- Select a MIDI clip on a melodic track or Drum Rack track.
- Open the Lil Green Helper and choose Flin.
If the clip already contains notes, Tap asks before replacing them. Starting Flin deletes those existing notes. Flin cannot run in the same clip as Companion, but it can coexist with decoupled automation.
Tap stores Flin's settings in a versioned [TapFlin:v2|…] marker in the clip name. When you return to that clip, Tap restores the streams, timing, mapping, quantization, velocity, and probability. Duplicating the clip also duplicates its Flin state.
The Flin Grid
- The 16 columns are independent note streams. On a melodic track, each column represents a pitch; on a Drum Rack track, each column represents a drum pad.
- The rows choose the stream rate. The top row is fastest and every row below it is slower.
- A stream falls from the top and triggers when it reaches the bottom. The selected rate stays visible as a stationary marker while the moving block shows the current phase.
- Each fall has 32 visual phases. The first 16 happen above the grid; the stream then enters at the top, crosses the 16 visible rows, and triggers at the bottom.
- The note names at the bottom show the pitch or drum pad assigned to each column.
Tap's Flin deliberately triggers at the bottom of the column. This is slightly different from the original monome behaviour, but makes the falling motion read naturally on a touchscreen.
Adding and Editing Streams
- Tap an empty column on the desired rate row to add a stream. Flin commits the change when your final finger leaves the screen.
- Drag across columns to add or remove several streams in one gesture.
- Tap an occupied column to remove that stream.
- Touch two rows in the same column to set the note length from the distance between your fingers.
- Long-press an active column to open its Velocity and Probability sliders.
When Live is already playing, a new stream's first onset follows the Quantize setting. With None, Flin preserves the natural phase. If the selected clip is stopped, the first stream is written at the clip start and launches the clip.
Timing Menu
The Lil Green Helper opens Flin's flat timing menu:
- Rate chooses how the 16 distinct row periods are spread between the fastest and slowest rows:
- OG follows the original Flin idea: integer period multiples from 1 through 16, extending the original eight-row instrument while keeping the top row fastest.
- Odd uses the odd-numbered multiples 1, 3, 5, and so on for a different set of relationships.
- Exponential spreads the periods progressively, leaving more room between the slower rows.
- Primes uses prime-number relationships for patterns that take longer to line up.
- Quantize can be None, 1/32, 1/16, 1/8, 1/4, or 1/2. It sets the grid for a stream's first onset without changing the row's natural period. None is the default.
- Quantize all appears when a grid is selected. Leave it off to snap only the first onset and let the row continue naturally, including off-grid repeats. Turn it on to snap every repeated onset to the selected grid.
- Base sets the main cycle length from 1/4 bar through 16 bars. The default is 4 bars.
- Row timings: Show/Hide displays the exact musical period beside each row. These labels describe the row rhythm, not the optional note-on grid.
- Horizon limits how far Tap writes ahead: 4, 8, 16, 32, 64, or 96 bars. The default is 64 bars. Exact writes the full common period when it fits; Limited respects the selected horizon.
Shorter horizons are quicker to rewrite while experimenting. Longer horizons preserve more of the full polymetric pattern before it repeats.
Pitches, Drum Pads, and Pages
Density decides how many columns each pitch or drum pad receives: 1, 2, 3, or 4. More columns let the same note run at several independent rates.
Use the left and right page buttons to move between lower and higher pitch or drum pages. The second Footer Bar page also gives you global octave transposition on melodic tracks, or movement in blocks of 16 drum notes. Streams outside the visible page keep running.
The Side Panel Velocity control adjusts all streams authored by Flin. The timing menu also includes commands to reset every stream's velocity or probability.
Remove All and Exit Flin
These two commands are intentionally different:
- Remove All clears all Flin streams and generated notes, but keeps the Flin marker and settings so you can start again quickly.
- Exit Flin removes the Flin marker and leaves the generated notes behind as a normal editable MIDI clip.
While Flin is active, Tap remaps a few familiar controls: the Side Panel Layout action becomes Exit Flin, the Footer Bar Quantize action becomes Remove All, and the Footer Bar ×2 action becomes Exit Flin. Record remains available, but the usual automation shortcut is disabled while Flin owns the sequencer surface.
If Flin does not appear, first check that Tap and the MIDI Remote Script are the same version. If a stream does not sound, check that the selected clip belongs to the current MIDI track and that its pitch or drum pad can trigger the loaded instrument.
3.3.6 Audio Clips
Select an audio clip and open the Device View to edit the clip itself. If an unarmed audio track has an empty slot, the slot shows a plus symbol. Tap it to select that slot, move to Device View, and open Tap's Samples browser. The empty audio editor also has a centred Load Sample button. If the audio track is armed, tapping an empty recordable slot records into it instead.
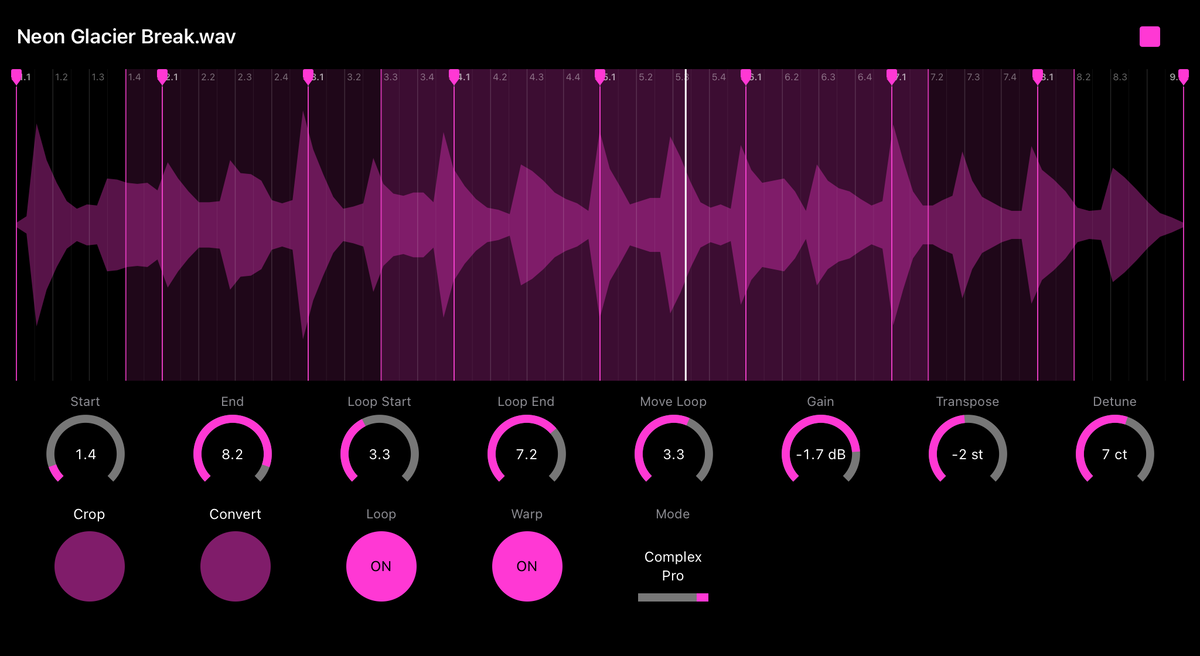
At the top of the audio editor:
- The left and right chevrons select the previous or next clip slot on the track. A grey chevron means that the adjacent slot does not currently contain an audio clip; the slot can still be selected.
- Play / Stop controls the selected audio clip. Three dots show that the start or stop request has been sent while Live is still changing state.
- Loop switches the clip loop on or off.
- Warp switches Warp on or off. When Warp is active, the Warp Mode selector appears beside it.
The waveform is an editor, not another play button:
- Pinch to zoom in or out, up to 16×. When zoomed in, drag left or right to move through the sample. Tap the zoom value to return to the complete waveform.
- With Warp active, the waveform shows musical grid lines and positions such as
1.2and1.4. The grid becomes finer as you zoom in. - Tap an empty place in the waveform to add a Warp Marker. Drag its square-and-triangle handle to move it; hold the handle to remove it.
- Slow Warp Marker movement is continuous. A normal or fast movement locks to the currently visible grid. If the first or last marker reaches the edge, keep holding and moving towards the edge to continue beyond the visible waveform.
- Tapping or dragging the waveform never starts, stops, scrubs, or retriggers the clip.
The eight controls below the waveform are Start, End, Loop Start, Loop End, Move Loop, Gain, Transpose, and Detune.
- Drag a marker or loop control up or down to move on the visible waveform grid. Drag left or right for continuous, off-grid movement.
- Loop Start and Loop End move separately. Move Loop moves both together and preserves the loop length.
- Gain is displayed in dB. Transpose moves in semitones. Detune moves in cents and carries across the ±50-cent boundary together with Transpose, just like Live.
Below those controls are two circle buttons:
- Crop removes the material outside the loop, or outside Start and End when Loop is off.
- Convert opens Tap's context menu with Simpler, Drum Pad, Harmony to MIDI, Melody to MIDI, and Drums to MIDI. The available conversions depend on the selected clip and the installed Live version; Tap shows Live's error if a requested conversion is unavailable.
You can also edit an automatable device parameter directly over the audio waveform. Hold Record ◯ in the Footer Bar and tap an automatable device encoder. Tap opens the same point, line, curve, selection, Pencil, and Curve Generator tools described in Automation Editing. While Automation Editing is open, the clip controls and actions below the waveform are hidden and the waveform expands to the Footer Bar, giving automation the largest possible drawing area. Start, End, and loop markers remain playback and editing references, while Tap can show automation across the available clip and source timeline. Pinching changes the visible waveform and automation viewport without discarding off-screen automation. Clip Gain, Transpose, and Detune remain directly editable clip controls, but Live does not expose them as selectable automation parameters to Tap.
3.4 Clips View
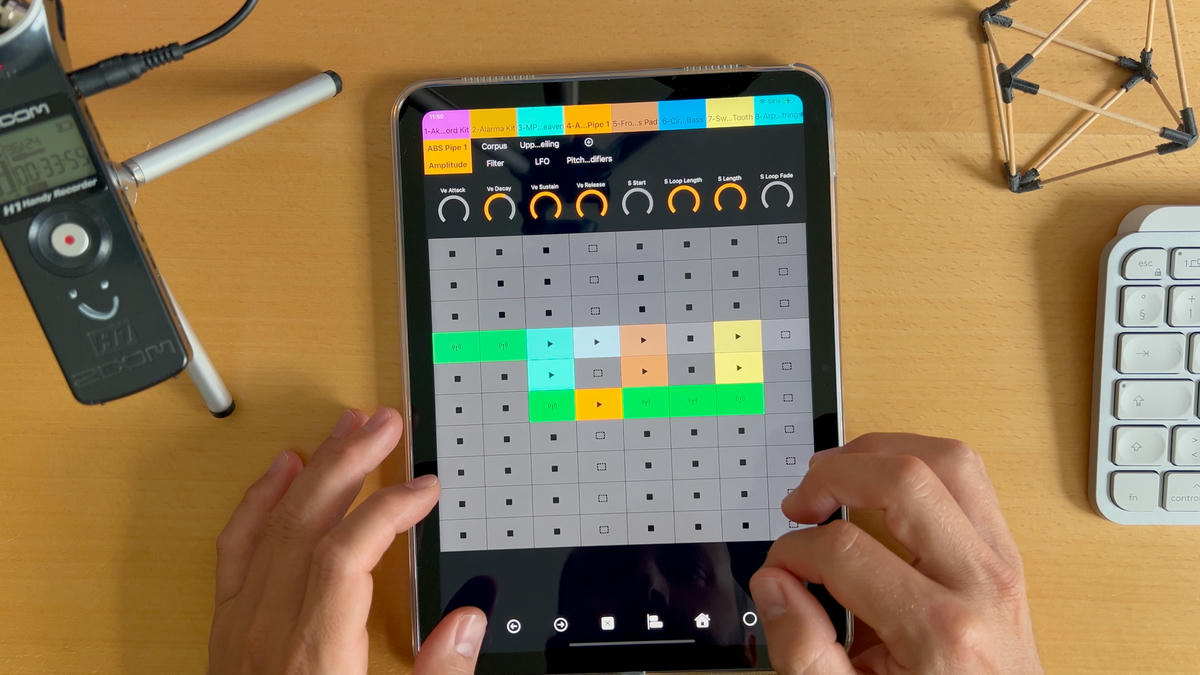
Shows the clips.
- Use the Tracks Bar to navigate horizontally; drag in the Clips View for navigating vertically.
- Start and stop clips by tapping on a clip. If you tap on an empty clip slot in a MIDI Track, Tap will take you to the Device View. If you tap an empty clip in an armed audio track (arm by long-press in the Tracks Bar, then tap "Toggle Arm"), the recording will start. Tap it again to stop the recording.
- Long-press on any clip slot to bring up a context menu (see below).
- Pressing the Side Panel button in the Footer Bar activates the Scene Launch buttons to launch scenes.
- Each scene row shows its name along the bottom of its clips when a name is set. A scene's tempo and time signature appear beside it when set.
- The selected device's Banks Bar and Encoders Section are displayed above the clip view, exactly like in the Device View.
3.4.1 Clip Slot Context Menu
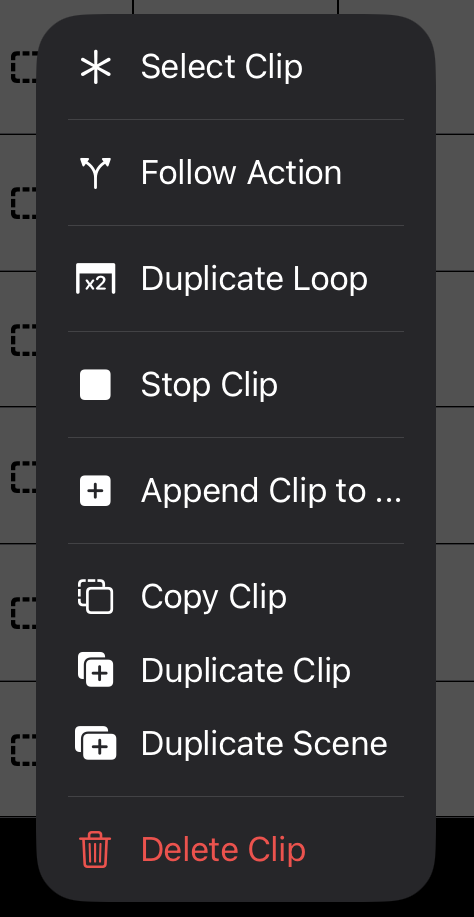
Inside the context menu, you can:
- Select the clip/clip slot
- Set or edit a Follow Action
- Remove the Follow Action, if the clip has one
- Rename, duplicate, or delete the scene
- Set or remove the scene's tempo and time signature
- if a clip is on the slot:
- Duplicate the loop of the clip
- Stop the clip
- Append the clip to another clip
- Simply tap on the clip you want to append to. The original clip will get added to the end of the tapped clip. The original clip will get removed.
- Copy the clip
- To paste simply tap on an empty clip slot
- Duplicate the clip
- Delete the clip
3.4.2 Follow Actions
Tap Follow Actions launch another clip or scene after the current clip or scene has played a chosen number of times. They are useful for automatic variations, fills, scene chains, and hands-free clip changes.
Follow Actions can be set in three places:
- Long-press a clip in Clips View and choose Follow Action.
- Long-press a scene launch button and choose Follow Action.
- Long-press a track in the Tracks Bar and choose Track Follow Actions to apply the same rule to all clips on that track.
Each Follow Action has a play count, two action choices, and a probability split between Action A and Action B. The available actions are Stop, Play Again, Previous, Next, First, Last, Any, Other, Jump, and None.
Tap stores Follow Actions in clip and scene names. This means you do not lose them when you close Tap. They continue to work as long as Live keeps the Tap MIDI Remote Script selected in Live's MIDI settings.
3.5 Mixer View
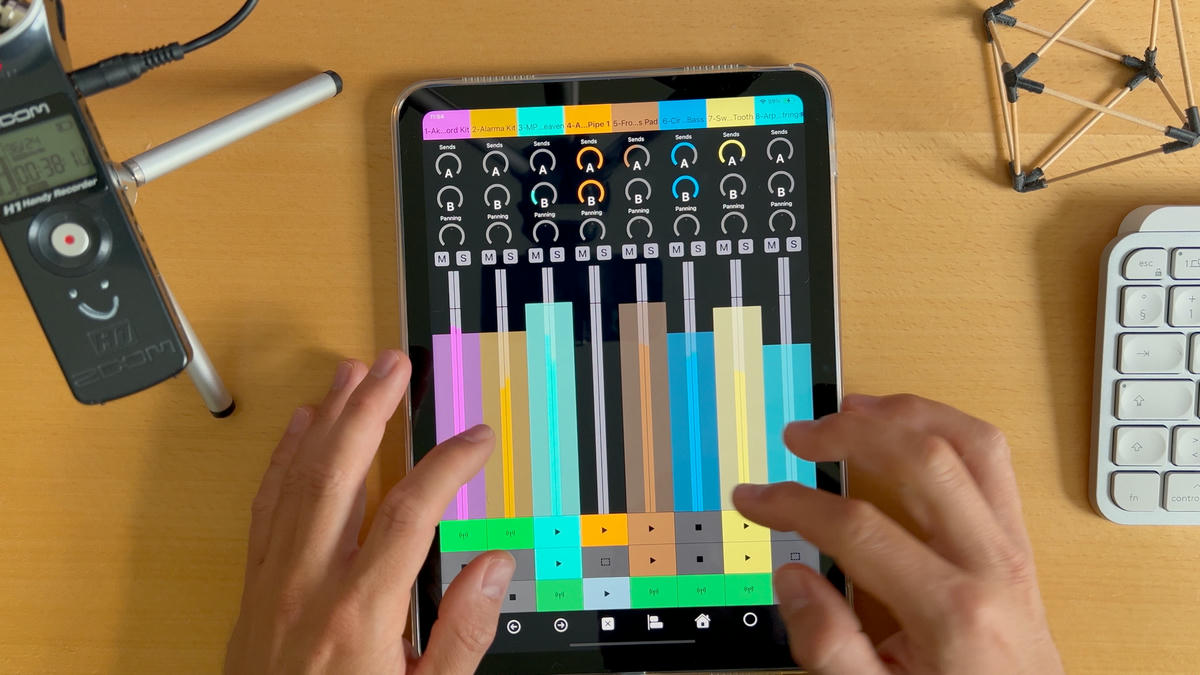
Shows the mixer section.
- Use the Tracks Bar to navigate.
- Double-tap the volume fader to set the volume to -inf dB. Use sends, panning, mute, and solo at your discretion.
- 0 dB is indicated by the horizontal line, any volume that crosses 0 dB will turn the volume meter red.
- Peak values (2-second hold) are indicated by little horizontal lines in the meter.
- Below the mixer section, there is a compact Clips View that allows you to interact with clips.
- Pressing the Side Panel button in the Footer Bar activates the Scene Launch buttons to launch scenes.
- Scene names, tempo, and time signatures appear along the bottom of each scene row in the compact Clips View when set.
3.6 Encoders View
Shows custom encoder layouts.
- You can create a custom encoder layout, or load a previously created layout by tapping the button in the top right-hand corner and choosing your adventure.
- Encoder layouts can include multiple pages.
- You can adjust the name, MIDI channel, and CC for each encoder.
- The navigation of the pages is done through the Footer Bar arrows.
- For encoder functionality, check the Encoders Section.
4. Tips and Tricks
4.1 Performance Features
These settings turn Tap into a powerhouse. If this feels overwhelming, you can practise more… or just turn them off:
Go to Settings → Performance Features → Deactivate all.
This will deactivate all the performance features:
- Header View Switching → while playing Tap, you can now switch views by tapping the already active channel. This frees the navigation buttons for other uses.
- Undo & Redo instead of Navigation and Octave Up & Down in Device View → With these enabled, you'll have octave up/down buttons in the Device View, while long-pressing still triggers undo/redo. In other views, the buttons continue to perform undo/redo as usual.
If you're on iPad in landscape mode, you'll always see the octave buttons in the Device View, regardless of these settings, as there's more space available for buttons. - Sequencer Page Changing in Footer Bar Only -> This allows you to page through the Sequencer pages with arrow buttons. You can swipe over the Octave buttons to access the page buttons in vertical mode. In horizontal mode you will always see the page move buttons. This makes it faster to select MIDI notes (and turn pages) as there is no more swipe action for page changing in the grid.
- Play Button Menu -> Turns the play button into a menu in the Sequencer (instead of a context menu).
Here's a basic instruction video to get you started with the Performance Features in Tap:
4.2 Velocity
When using the MIDI pads or the step sequencer, you can tap the Side Panel button in the Footer Bar and navigate to the Velocity section. From there, you can directly adjust the velocity of notes you play on the pads or add in the step sequencer. Velocity is also available for the Track Controls in Devices Bar
Ableton Live is a trademark of Ableton AG, registered in the United States and other countries.
iPhone and iPad are trademarks of Apple Inc., registered in the United States and other countries.